
Testing gRPC #5: Load test a gRPC service

This is the final blog in this series where we explored gRPC testing and automation.
A quick recap, In the previous blogs in this series, we explored testing different layers of the test pyramid within gRPC context:
- What gRPC is, using web UI to explore the API
- How to unit test the server
- How to unit test the client code.
- How to E2E test a server method
Please feel free to catch up on those before reading this one.
What you’ll learn? 🌱
In this blog, I’ll explore how to setup a load test written in Java leveraging locust4j library to setup a locust slave.
Our slave worker will push aggregated results to a python based locust server.
I hope you are also excited like I am to explore this topic.
Let’s go 🏃
Why write load tests?
Any modern successful business is bound to hit scale at some point in their journey. When it does, you don’t want to caught with a bad surprise wherein your systems are not able to scale, handle faults gracefully.
Load testing prepares engineering teams for such events.
Identifying how the system holds up with next level of scale is extremely important.
A system that is not scalable, reliable or fault tolerant when put under stress would let down its users and often that means direct revenue loss or even worse losing a customers trust.
Preventing such bugs to leak to production should be an acceptance criteria for any service seeing the light of the day in production.
⚓ Setup locust master
I hope we are on the same page that writing load tests are super important.
Let’s focus on understanding how to do this for our route guide service
We will use popular load testing framework called locust for this example. I had previously explored how to write a locust python test on a mock API. Please feel free to give ita read if interested
How to setup a load test via Locust - automation hacks
We will need python3 to be installed on our machine.
Most modern mac comes with python3 pre-installed, if not, you can follow this wonderful guide to Properly Installing Python
We will also setup virtualenv to install required dependency, in this case locust and will use Pipenv. You can read How to manage your python virtualenvs with Pipenv - Automation Hacks to get familiar with Pipenv
Below is a short summary:
Ensure you have below setup in your .zshrc, .bash_profile or in your windows system environment variables
# One time setup
# Set below in .zshrc or .bash_profile depending upon the type of shell you are using
export WORKON_HOME=~/virtualenvs
export VIRTUALENVWRAPPER_PYTHON=/usr/local/bin/python3
export LANG=en_US.UTF-8
export LC_ALL=en_US.UTF-8
Next install pipenv using python3
pip3 install pipenv
You can then clone or take a pull from this repository GitHub - automationhacks/grasp-grpc: Ports routeguide example service from grpc-java repository and adds functional and non functional API tests and ensure you cd to folder with Pipfile
Run below to start virtualenv
pipenv shell
Finally, we’ll start our locust master server using:
locust -f locust_master.py --master --master-bind-host=127.0.0.1 --master-bind-port=5557
You’ll see something like this
[2024-05-31 08:29:15,073] Gauravs-Laptop/INFO/locust.main: Starting web interface at http://0.0.0.0:8089
[2024-05-31 08:29:15,078] Gauravs-Laptop/INFO/locust.main: Starting Locust 2.28.0
What does this command do?
Here we are running a dummy locust server in master mode and binding the server to localhost and a random port 5557. In a production setup, this script could be running on a remote server which we would use in our tests.
Below is how locust_master.py looks like:
from locust import User, TaskSet, task

class DummyTask(TaskSet):
   @task(1)
   def dummy(self):
       pass

class Dummy(User):
   tasks = [DummyTask]
Here we init DummyTask as a sub class of TaskSet and have a method dummy with a weight of 1 using the @task() annotation.
Weight is a way in locust to increase the probability of a certain task to be picked ahead of others. In this case, we have a single task so it does not really matter.
class DummyTask(TaskSet):
   @task(1)
   def dummy(self):
       pass
We also have the Dummy class of type User with our tasks list with this DummyTask
class Dummy(User):
   tasks = [DummyTask]
Generate required files using proto compiler
Ensure all relevant files are generated using gRPC proto compiler by executing below.
./gradlew installDist
You only need to run this if you’ve made some changes to the proto message or RPC. This step could be skipped if there are no changes. In a prod setup, you may have a automation process that updates dependencies as part of a CI/CD pipeline
Start gRPC server
Next, let’s ensure our server and API is up by executing below
./build/install/grasp-grpc/bin/route-guide-server
You’ll see something like this
SLF4J: Failed to load class "org.slf4j.impl.StaticLoggerBinder".
SLF4J: Defaulting to no-operation (NOP) logger implementation
SLF4J: See http://www.slf4j.org/codes.html#StaticLoggerBinder for further details.
May 31, 2024 8:34:47 AM io.automationhacks.routeguide.RouteGuideServer start
INFO: Server started, listening on 8980
Writing a locust slave
The key component of this load test is a locust slave written in Java that can be used by locust4j to start load test.
I’ve added an example slave in RouteGuideLoadGen.java
And it looks like below:
package io.automationhacks.routeguide.perf;

import com.github.myzhan.locust4j.Locust;
import io.automationhacks.routeguide.perf.tasks.GetFeatureTask;

import static io.automationhacks.routeguide.constants.Constants.*;

public class RouteGuideLoadGen {

 public void getFeatureLoad() {
   var locust = configureLocustMaster();

   locust.run(new GetFeatureTask(1));
 }

 private Locust configureLocustMaster() {
   var locust = Locust.getInstance();

   locust.setMasterHost(LOCUST_MASTER_HOST);
   locust.setMasterPort(LOCUST_MASTER_PORT);
   locust.setMaxRPS(LOCUST_MAX_RPS);

   return locust;
 }

 public static void main(String[] args) {
   new RouteGuideLoadGen().getFeatureLoad();
 }
}
Let’s unpack this
We have a method to configure our slave worker with the locust master instance
We then invoke the run method and provide it a task instance
public void getFeatureLoad() {
   var locust = configureLocustMaster();

   locust.run(new GetFeatureTask(1));
 }
We also use the below method to get a Locust instance and set the master host, port as well as the peak requests per second (RPS) for the slave.
private Locust configureLocustMaster() {
   var locust = Locust.getInstance();

   locust.setMasterHost(LOCUST_MASTER_HOST);
   locust.setMasterPort(LOCUST_MASTER_PORT);
   locust.setMaxRPS(LOCUST_MAX_RPS);

   return locust;
 }
Locust load task
We also have to write a Locust task that has the actual gRPC API that we want to invoke.
public class GetFeatureTask extends AbstractTask {
 private final int weight;

 RouteGuideTestClient client =
     new RouteGuideTestClient(ROUTE_GUIDE_SERVER_HOST, ROUTE_GUIDE_SERVER_PORT);

 public GetFeatureTask(int weight) {
   this.weight = weight;
 }

 @Override
 public int getWeight() {
   return weight;
 }

 public String getName() {
   return "RouteGuide.GetFeature";
 }

 public void execute() {
   int latitude = 407838351;
   int longitude = -746143763;

   Point point = Point.newBuilder().setLatitude(latitude).setLongitude(longitude).build();

   // Record the startTime for the API call
   var startTime = getTime();
   // Add thread safe logic here to make the API call
   Feature response = client.getFeature(point);
   // Record the endTime for the API call
   var endTime = getTime();

   // Do not swallow any exceptions from the API, we should propagate any exceptions to locust
   assertWithMessage(
           "Could not find the feature at lat: %s long: %s".formatted(latitude, longitude))
       .that(response.getName())
       .isEqualTo("Patriots Path, Mendham, NJ 07945, USA");

   // Record success or failure to locust
   long responseTime = endTime - startTime;
   int contentLength = response.getName().length();

   Locust.getInstance()
       .recordSuccess("GetFeature", response.getName(), responseTime, contentLength);
 }
}
Above is the complete method, let’s understand how this works
We create a task GetFeatureTask that extends AbstractTask from locust4j
We configure the local Grpc client
RouteGuideTestClient client =
     new RouteGuideTestClient(ROUTE_GUIDE_SERVER_HOST, ROUTE_GUIDE_SERVER_PORT);
And also configure a constructor and getter to set custom weight if we want from the caller
public GetFeatureTask(int weight) {
   this.weight = weight;
 }

 @Override
 public int getWeight() {
   return weight;
 }
We set the name to be used during the load test
public String getName() {
   return "RouteGuide.GetFeature";
 }
Finally the execute method has the actual logic wherein we invoke the locally running service
public void execute() {
   int latitude = 407838351;
   int longitude = -746143763;

   Point point = Point.newBuilder().setLatitude(latitude).setLongitude(longitude).build();

   // Record the startTime for the API call
   var startTime = getTime();
   // Add thread safe logic here to make the API call
   Feature response = client.getFeature(point);
   // Record the endTime for the API call
   var endTime = getTime();

   // Do not swallow any exceptions from the API, we should propagate any exceptions to locust
   assertWithMessage(
           "Could not find the feature at lat: %s long: %s".formatted(latitude, longitude))
       .that(response.getName())
       .isEqualTo("Patriots Path, Mendham, NJ 07945, USA");

   // Record success or failure to locust
   long responseTime = endTime - startTime;
   int contentLength = response.getName().length();

   Locust.getInstance()
       .recordSuccess("GetFeature", response.getName(), responseTime, contentLength);
 }
An interesting thing to note is that we capture the total time taken for the API call and response to come back and then later on persist it in the Locust instance using below:
Locust.getInstance()
       .recordSuccess("GetFeature", response.getName(), responseTime, contentLength);
Start the load test
We can run RouteGuideLoadGen.java to start the slave and register it with the master.
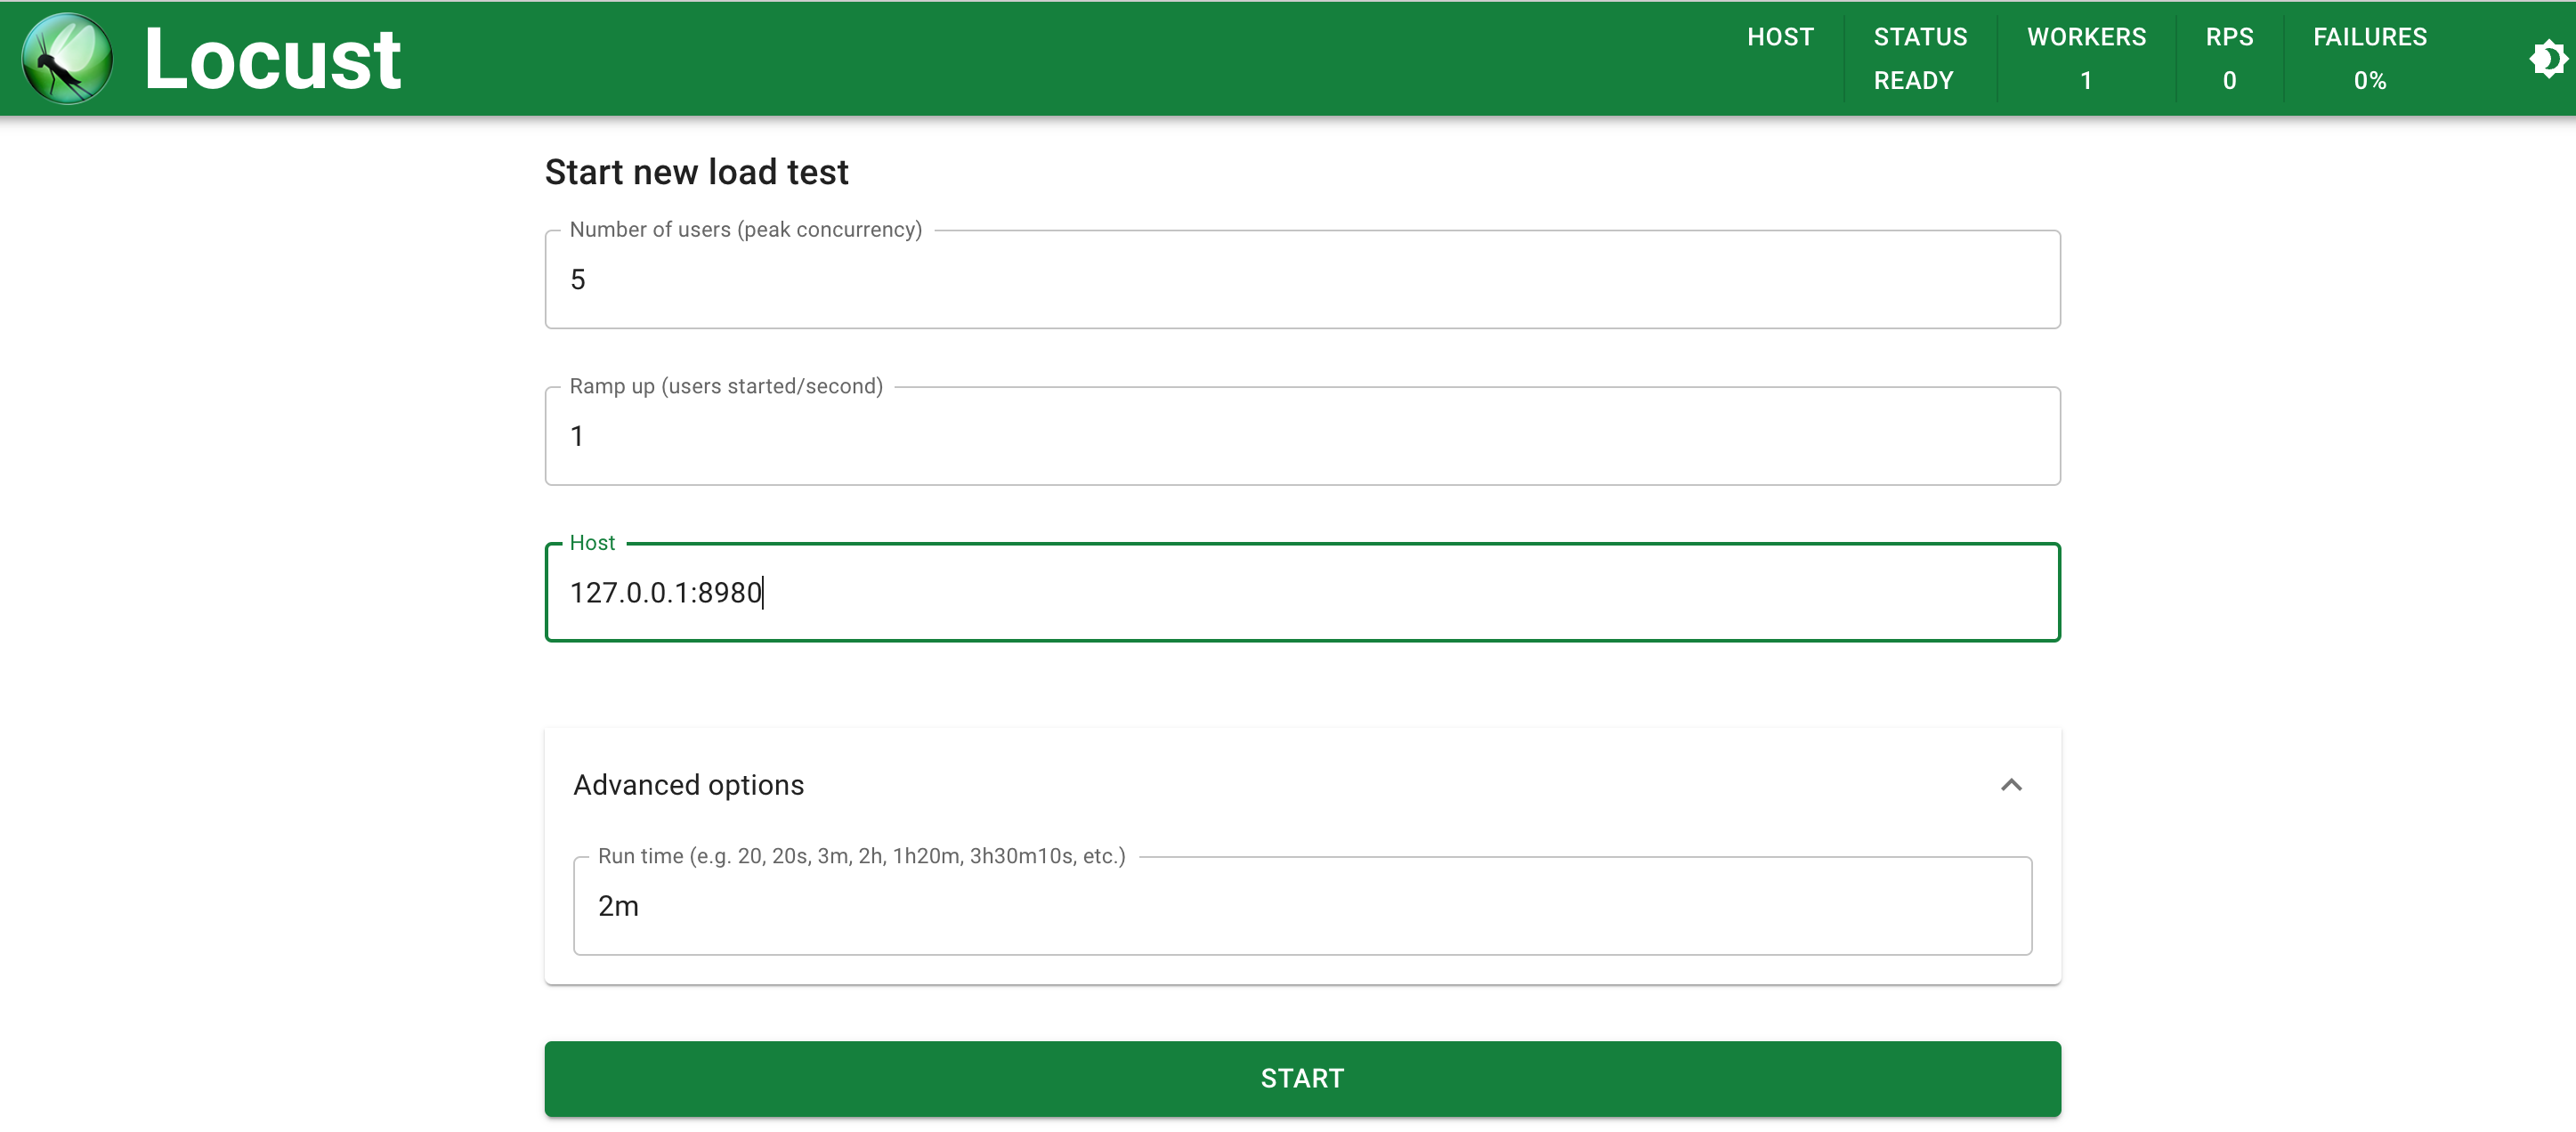
If we navigate to the locust master host running at http://0.0.0.0:8089, we can see below UI
Here we’ll be kind and just use 5 users with a ramp up of 1 user per second.
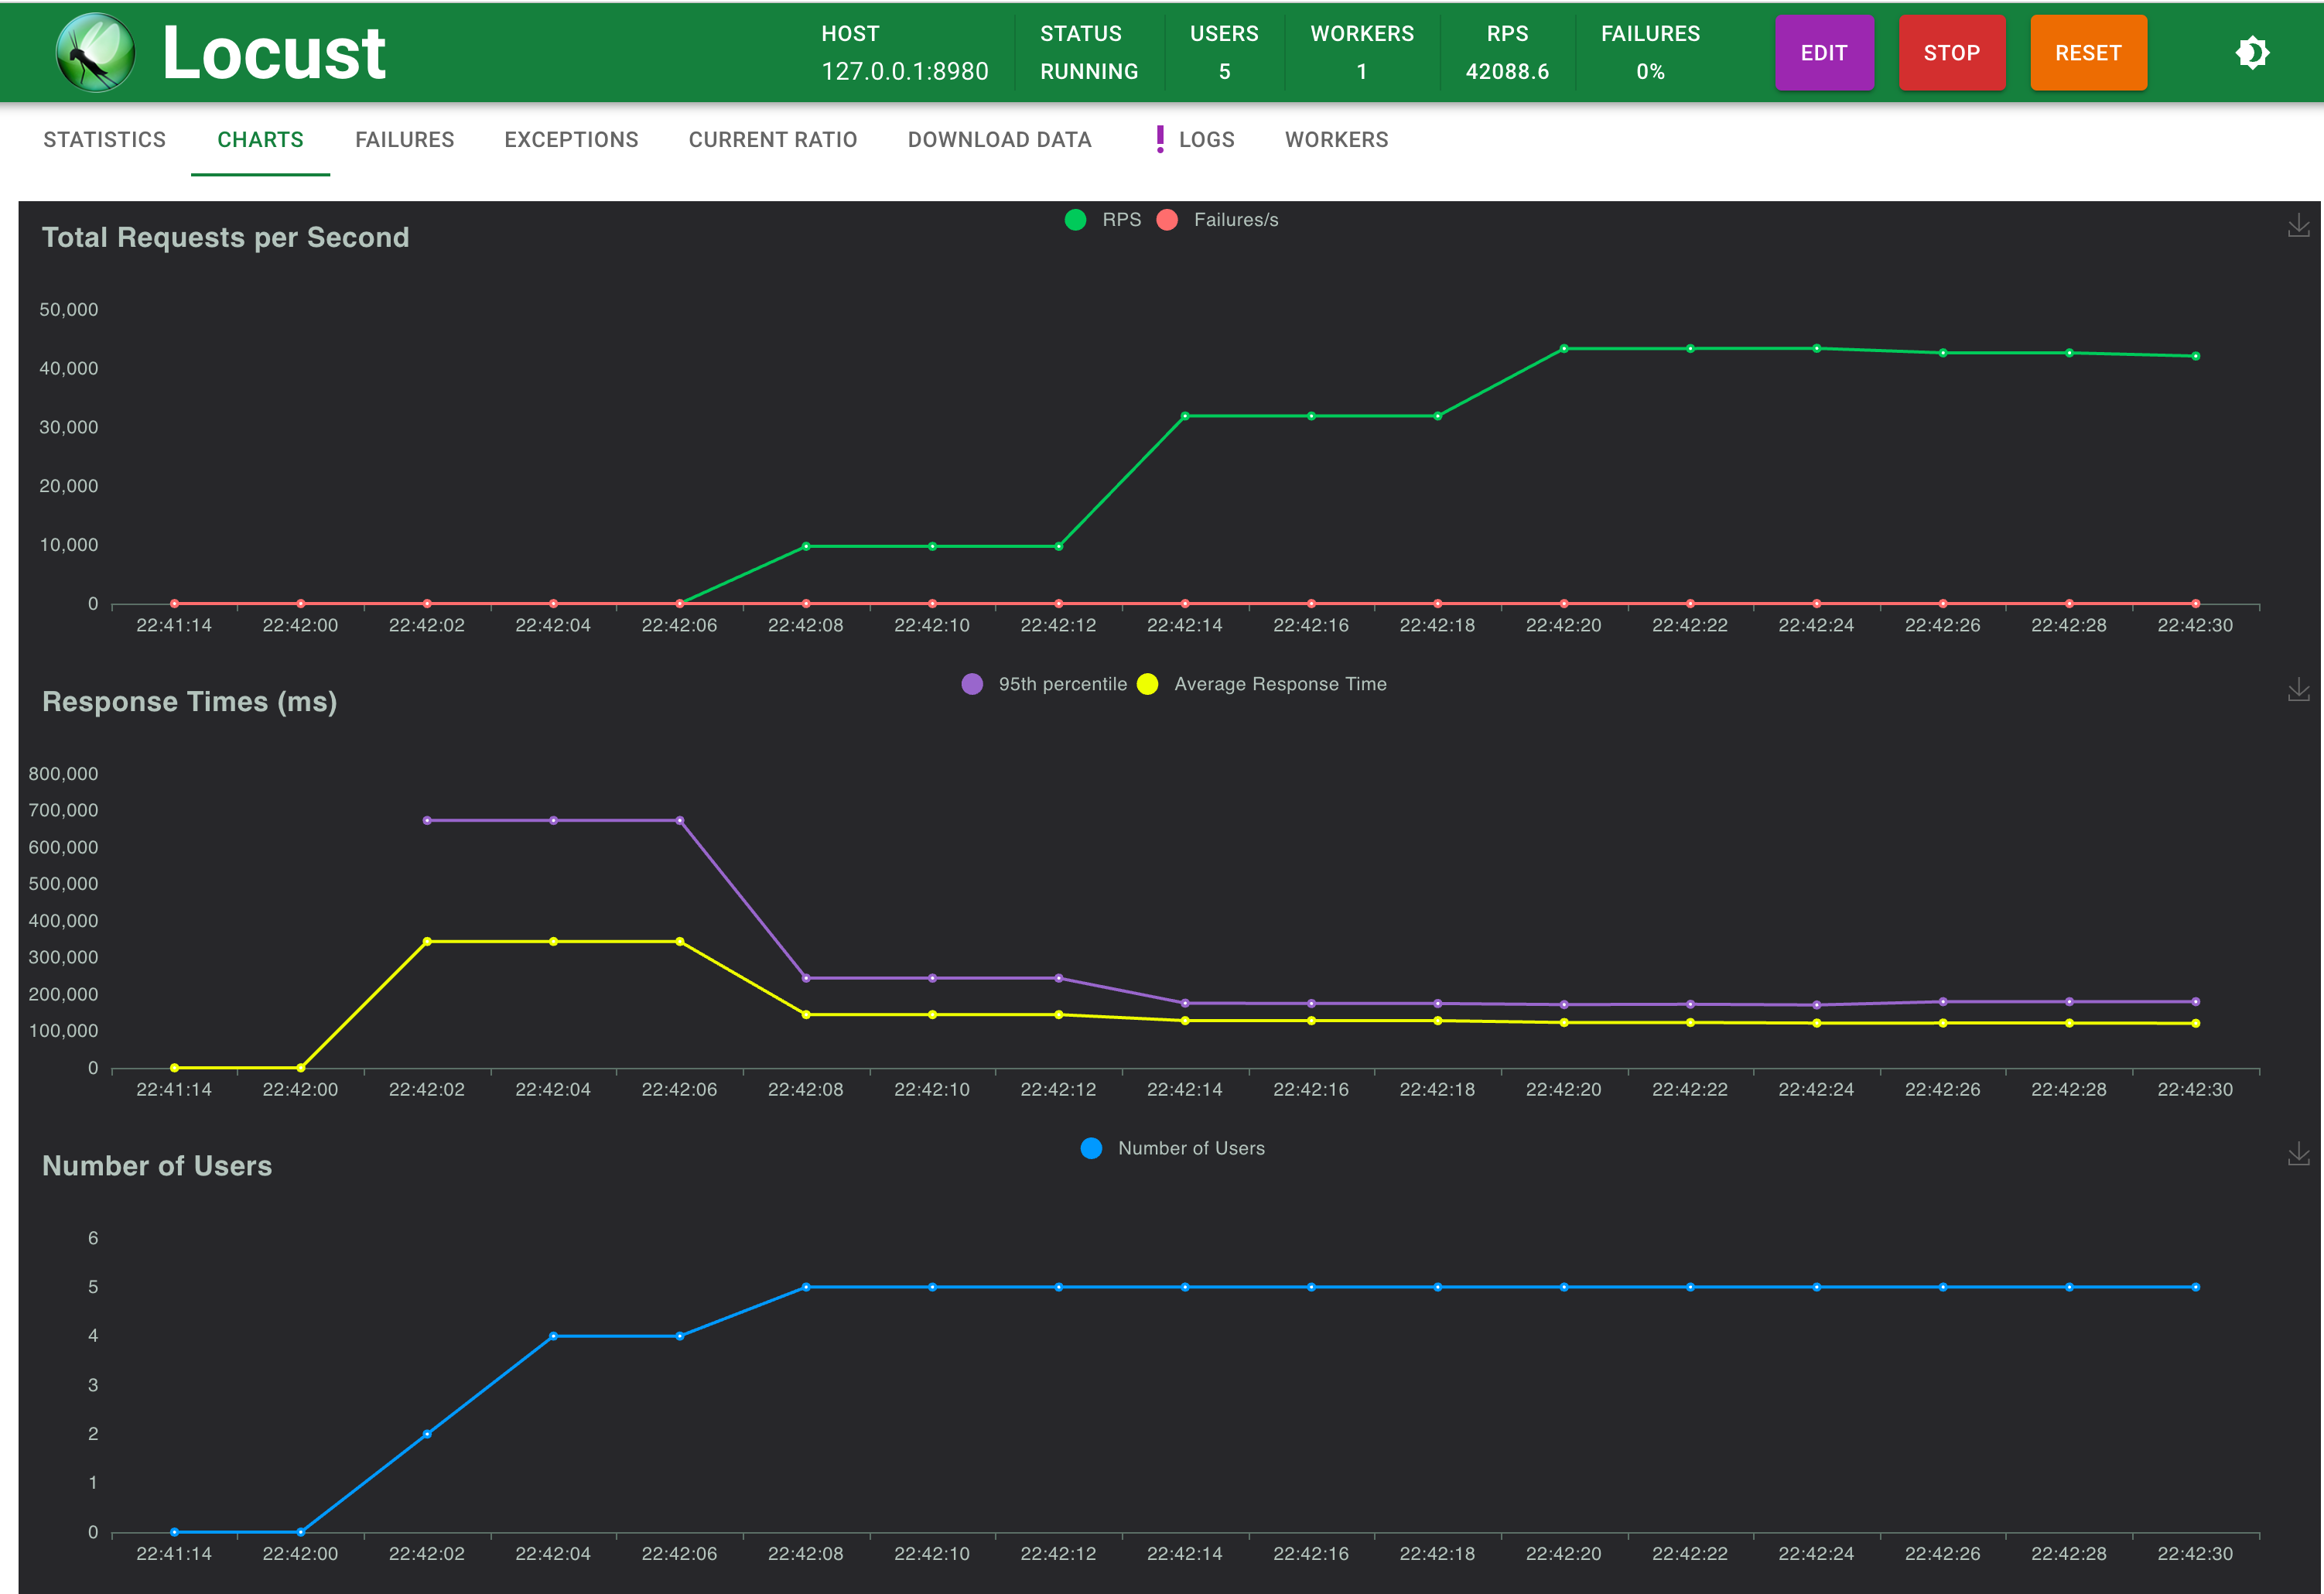
We can see the charts with real time performance RPS and failure stats and other diagnostic data.
The workers tab also shows the current no of workers registered

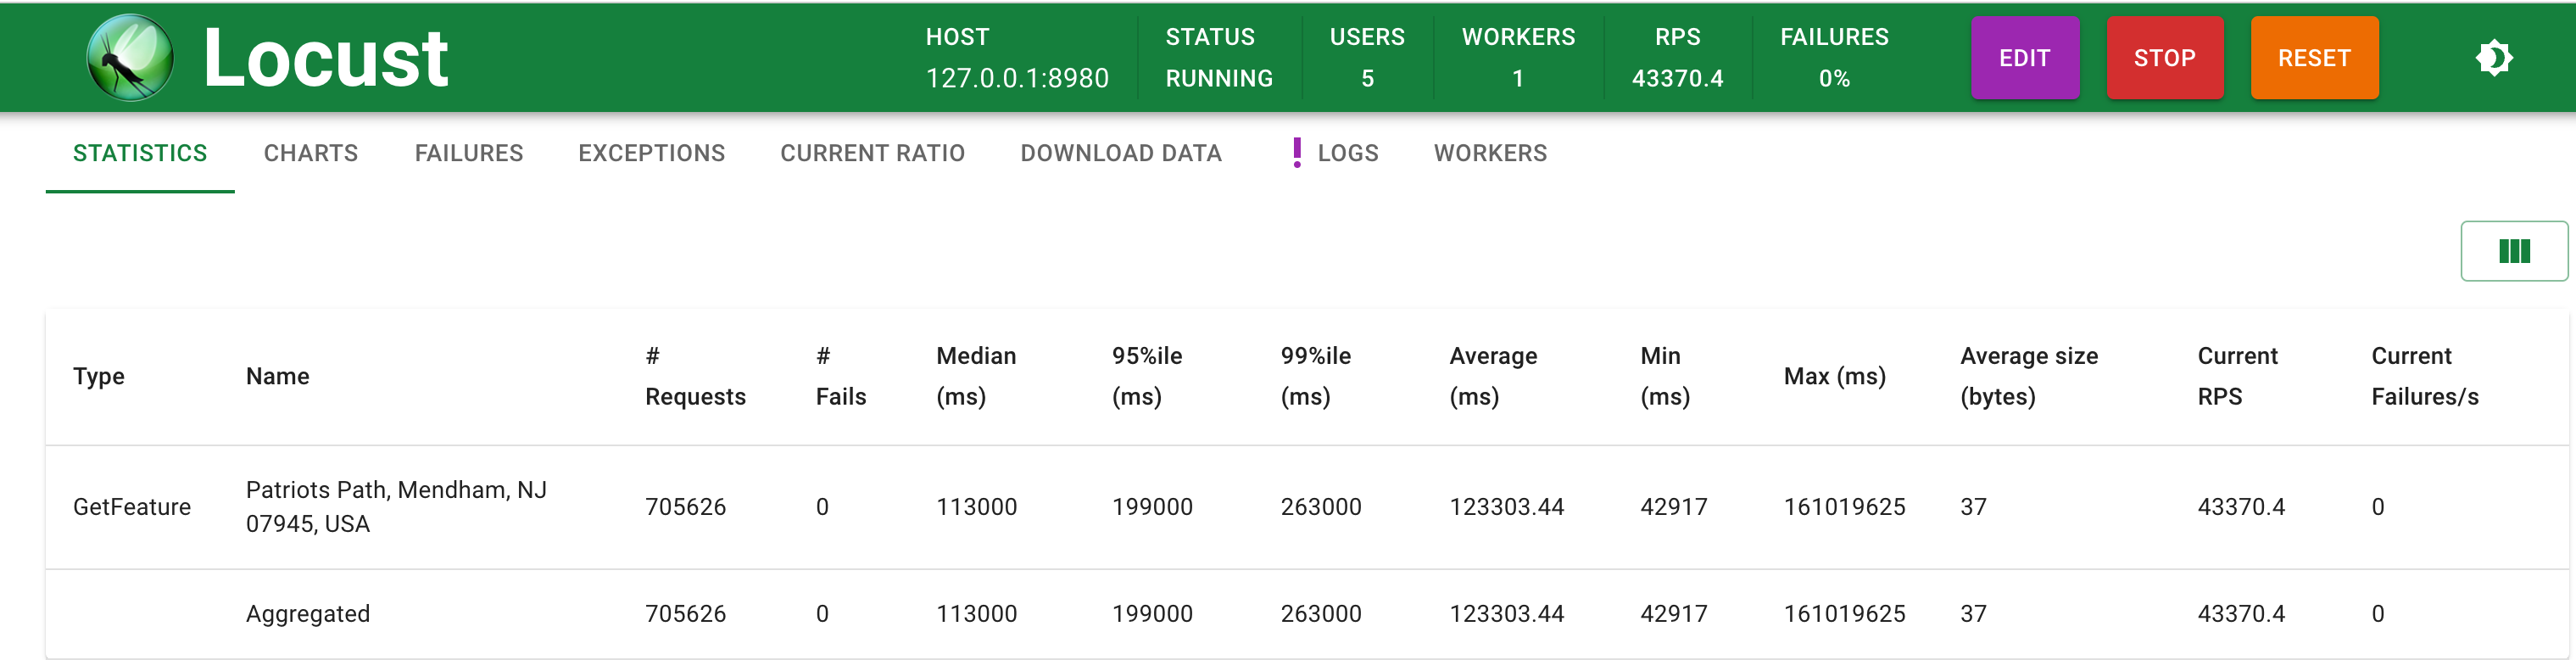
And we can also see stats about the overall test
Since this is a local test running on my machine, I also used the Activity monitor app and could see spike in CPU and memory usage stats while the test was running. Within a short time, I bombarded 40K RPS on my locally hosted service. Surely a pretty sizable scale for a single service. 🤩
References
Standing on the shoulder of giants.
I referred to below resources to come up with this write up. Hopefully this is useful for your further exploration.
- Locust python notes on Grpc testing
- Grpc Test Infra
- Distributed Load Testing of REST/gRPC APIs using Locust
- Blog from blazemeter
- Locust4j
- Example Main.java file to start a locust test
- Locust Http load example project
- Locust Http load another example project
- wrk an example HTTP benchmarking tool
Conclusion
This was a short introduction to the world of load testing with locust and demos how you are not really limited to knowing python to leverage this wonderful tool. I hope you’ll give it a try and explore the nitty gritties of this tool
To summarize, we learned:
- We can write locust load test for a gRPC service using Java with a slave to Locust master setup
- How to setup locust master in python
- How to generate required build file for Java gRPC service
- Start a local gRPC server
- Write a utility to setup a Locust Java slave worker
- Start execution and observe metrics on Locust web UI
Please let me know if you have questions or thoughts in the comments.
| Thanks for the time you spent reading this 🙌. If you found this post helpful, please subscribe to the substack newsletter and follow my YouTube channel (@automationhacks) for more such insights in Software Testing and Automation. Until next time 👋, Happy Testing 🕵🏻 and Learning! 🌱 | Newsletter | YouTube | Blog | Twitter. |
Comments