
Migrated away from Wordpress

Attribution: Wordpress logo, Jekyll logo
Hi there 😄
I’ve recently moved the blog away from Wordpress and have dived into the wonderful word of static site generators using Jekyll and Github pages. This post talks about how the overall process looked like and what were some of the additional customizations I added along with references. Let’s get started.
Why
Why? You might ask, Well, Wordpress had been great for me initially. It enabled me to start blogging without any consideration of the technical setup needed and it was quite easy to have a fully featured blog within minutes
However over time, the overall experience felt a bit bloated and what i realized is that I do not really make use of all the capability that Wordpress as a platform offered.
Also, For any new functionality that I might need, I had to add Wordpress plugins (and that requires a business plan at the least)
It conflicted with my goals of having a minimal, fast technical blog/portfolio site that I have full control over and customize to whatever needs might arise and this ultimately motivated me to take the plunge and move away from Wordpress
Welcome to the world of static site generators (SSG)
I had been aware of static site generators before and had heard of Jekyll, Hugo, Sphinx among many others. Watched a few videos around this and ultimately found Jekyll to have the required functionality and customization for my needs
One of the motivating factors in favor of Jekyll was that it has a very tight integration with Github, plus the hosting of the site is very graciously taken care of by Github. I had to only buy the domain on Namecheap and do setup and the site was good to go. 🙌
The icing on the top was that my entire workflow involves writing posts in plain markdown and then using Git and Github for the publishing workflow. Can’t get more minimal than that. 😆
There were many good tutorials that other people had already put out for this process and that i referred while migrating, check them out
- Tomomi Imura - How-to: Migrating Blog from WordPress to Jekyll, and Host on Github
- Sam Atkinson - Migrating a blog from Wordpress to Jekyll
- Hadi Hariri - Migrating from WordPress.com to Jekyll
- WebJeda - 4 Steps To Migrate From WordPress To Jekyll
Below are the steps that I took and my experience around it.
Download content from Wordpress and import into Jekyll
Depending on which platform your current blog is hosted on, there are different importers that you could use to convert the dumps to a format that Jekyll can understand
My site was hosted on wordpress.com and so I had to download the content and then run
Jekyll import tool
Once done with above, It gave me a sample layout with all the images and other posts in _posts
directory
Install ruby and gems
Jekyll docs are very well written and explain these in detail, Before starting ensure you have Ruby, RubyGems and other libs setup. Follow instructions from Jekyll Quickstart
Once done, Below are the steps to create a new Jekyll site
Create an empty Jekyll site with default minima theme
jekyll new <yourname.github.io>
Note: You should have a repository with yourname.github.io in GitHub already, You can either create it first and then clone and then run above command or use
git remote add origin <your_repo_url>> Read more here
You can serve the newly created site on localhost, which you can access on port 4000. localhost:4000:
bundle exec jekyll serve
In Jekyll, posts are maintained in _posts directory and are ordered in yyyy-mm-dd-<title>
format, You can also write drafts in _drafts folder and Jekyll is smart enough to not serve these
on your site until you are ready and move it under posts
If you want to view drafts in your local served Jekyll website
jekyll serve --draft
Push to GitHub and you are live
Once you push the site to Github it would take a couple of minutes for it to be setup
Setting up domain
You can go with the default domain (.github.io) or setup your own.
To setup your own domain, create a file CNAME in folder root and add your domain name
automationhacks.io
Modify Github settings
You also would need to add this domain in your repositories settings
Add this domain in Custom domain and also select Enforce HTTPS if your domain supports SSL. Read more about how to do this on Github docs
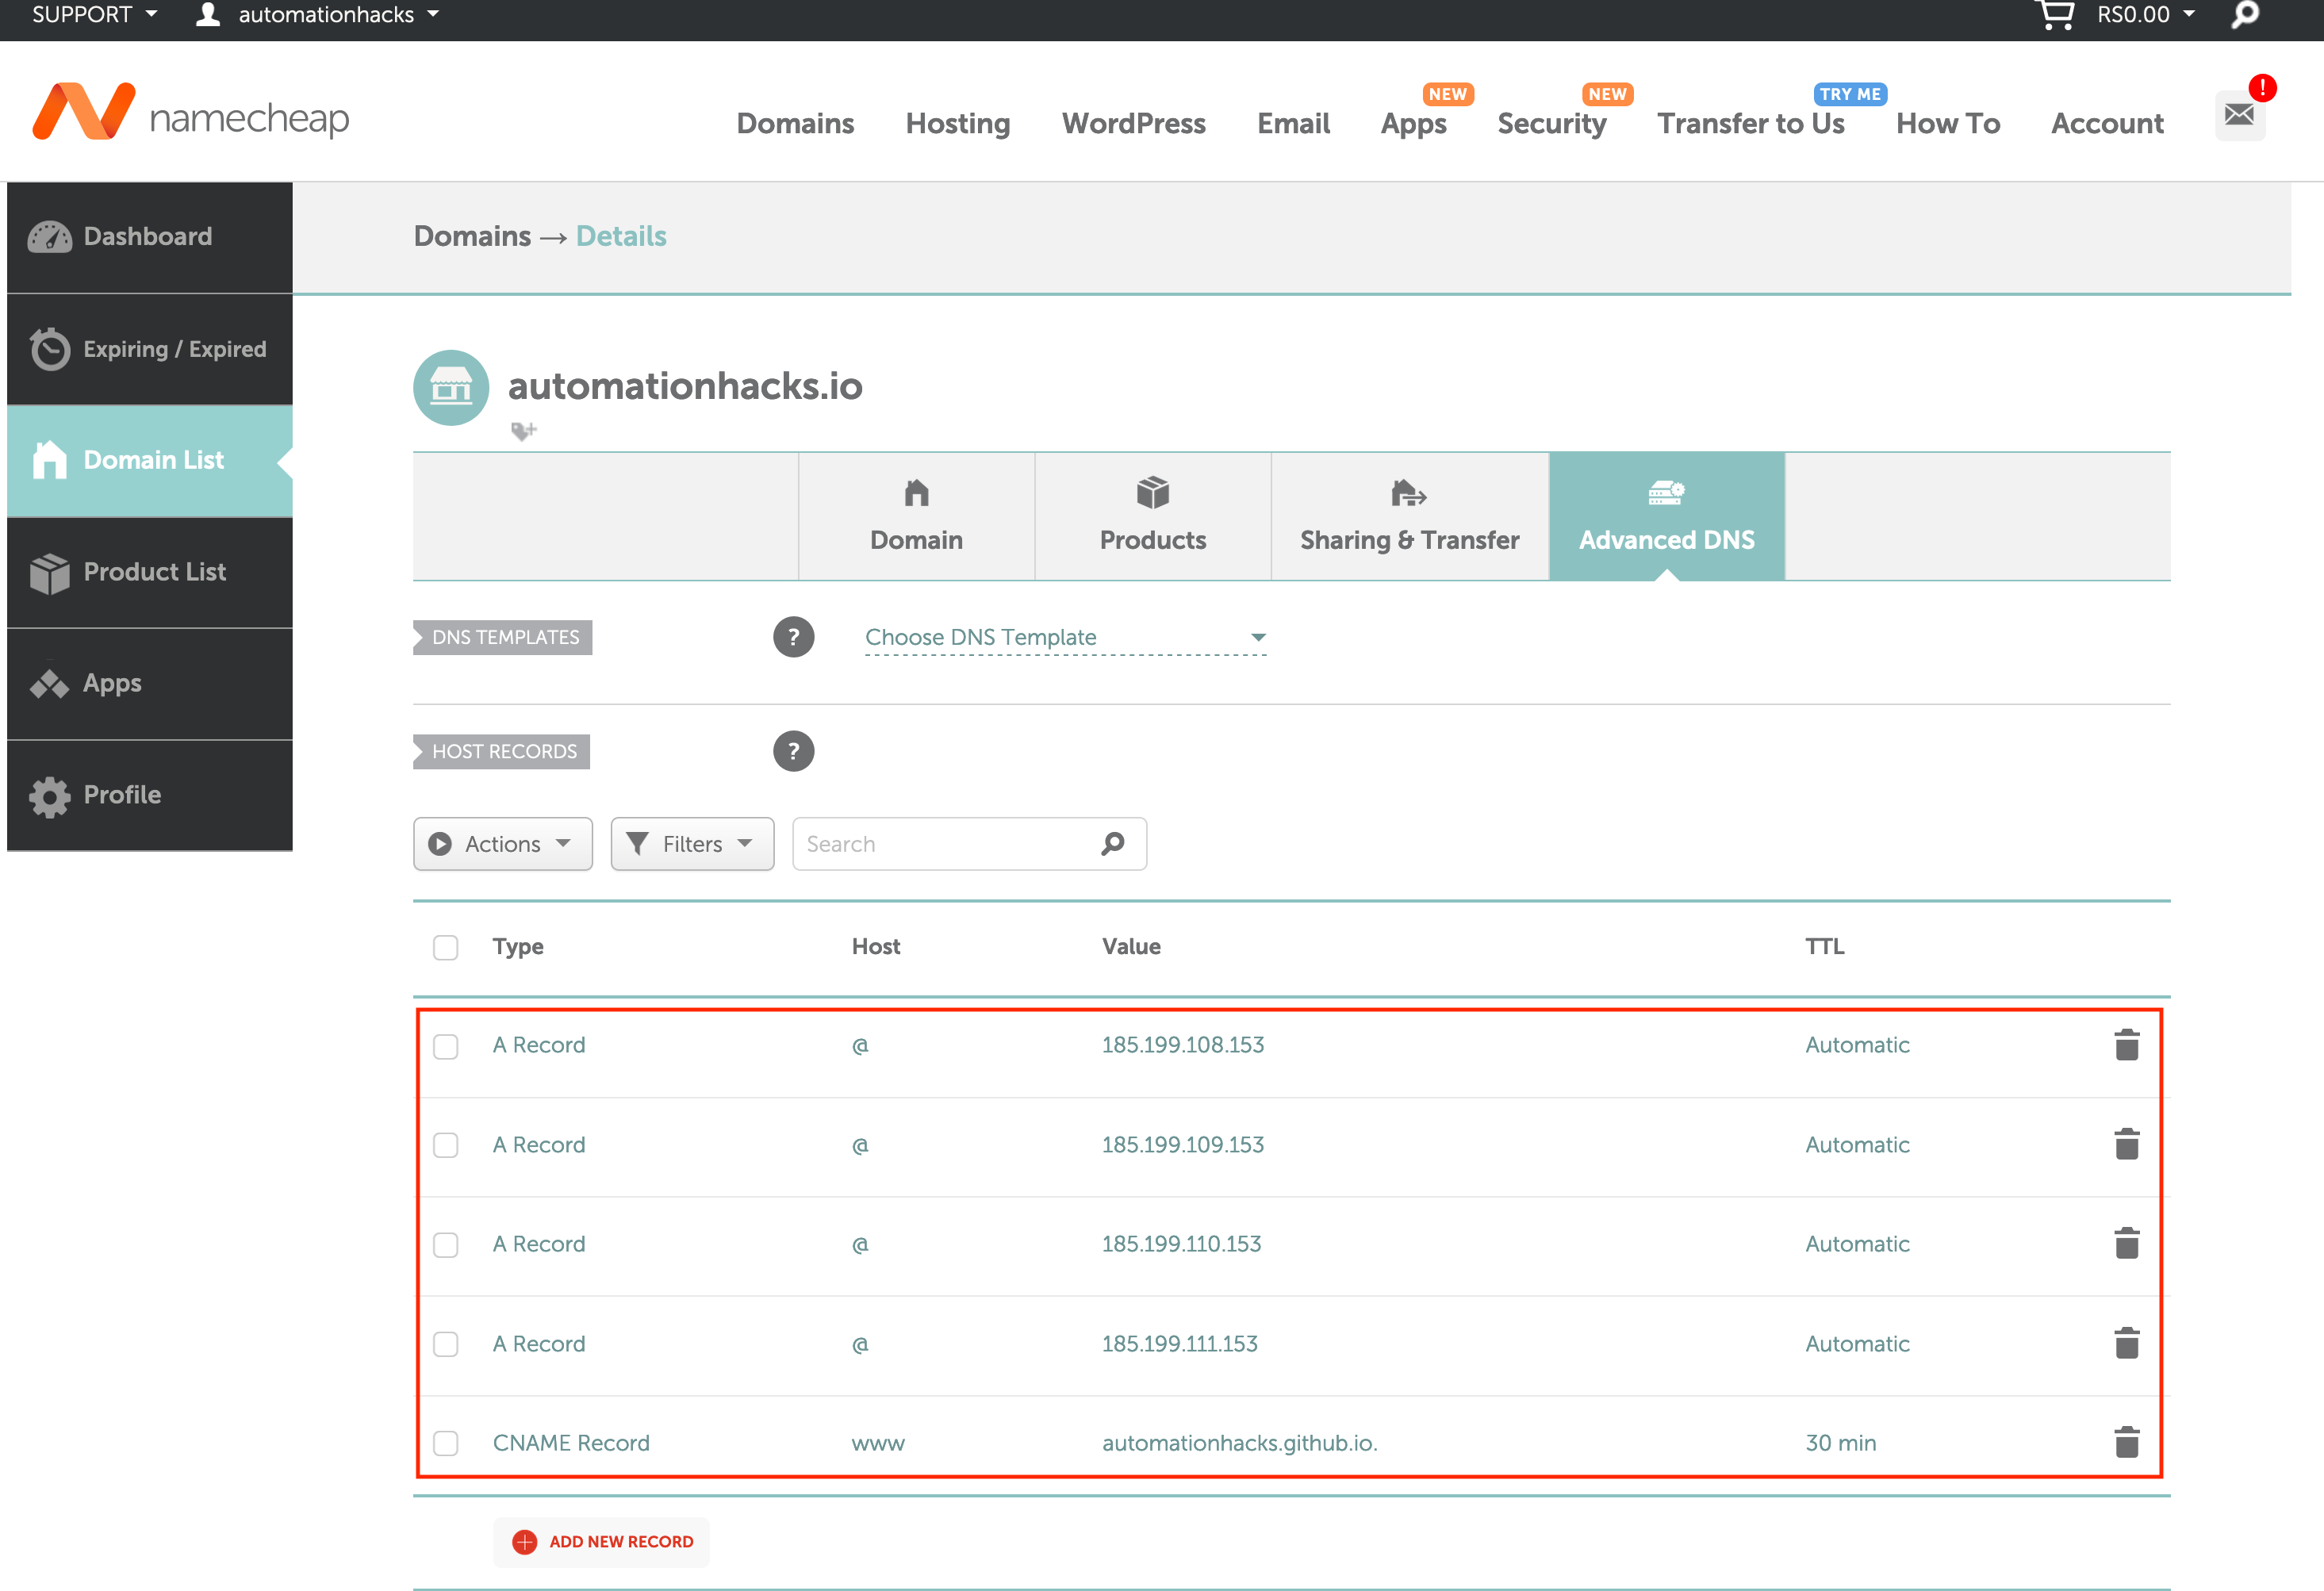
Update DNS provider
You can very easily buy a domain of whatever provider you want. I use namecheap for my site and you
need to setup A record in your Advanced DNS settings. Note the IP address of Github servers might
have changed so figure out the latest ones and replace in your settings
Once the setting has been done in your Github repository and the domain provider. Wait for some time for the setting to take effect. Usually a few hours but can take max of upto 24 hours
Let’s start customizing with plugins
Jekyll uses Gems for most of the additional functionality that you might
need and associated plugins, Below is the basic process for installing and adding any new Gem into
the site
Add below lines in _config.yml under group :jekyll_plugins do, Below are the ones that I have
initially added and few of which I would explain in further sections or future blog posts
group :jekyll_plugins do
  gem "jekyll-feed", "~> 0.12"
  gem "jekyll-seo-tag", "~> 2.6"
  gem "jekyll-gist"
end
You can then install all the gems mentioned in Gemfile using below:
bundle install
Then, add these under plugins list in _config.yml
plugins:
  - jekyll-feed
  - jekyll-paginate
  - jekyll-seo-tag
  - jekyll-gist
  - jekyll-twitter-plugin
Some manual fixes to be made
The export and import process leaves some cleanup activities to be done on the posts/pages, For a large enough site you might want to automate some of these
Encoded Strings
- You might see some encoded strings show up and might want to replace with character listed next:
’ <single quote>
<space>
Get Github gists to render
- Also if you’ve been using Github gists for code samples, You might find these not rendered on the page. To fix these, Find the html code blocks with data-gist and replace with below liquid tag, The cool thing here is that since its your own Github account, you only need to specify the UUID like ID for gists to be rendered
gist d366955370d58dc2ca40c185b62cd829
Enclosed with liquid tags
Fix images
You can move all the images downloaded from Wordpress into an assets/images folder and then fix
the references in your posts/pages such that they are served from your repository
Some steps for the same can be:
- Search for
<figure> or <img>tag and replace it with markdown syntax ofor change thesrcattribute, You might have all the images in awp-contentfolder and so the easiest thing is to move the entire folder underassets/imagesand then fix the references to these images - To be more specific, replace all image URLs beginning with
/wp-contentwith/assets/images/wp-content
Optional updates
- Search for
<pre>tag and replace with code-block in order to get syntax highlighting using Jekyll rouge - If you are cross posting your blog on sites like
dev.toormedium, then you might want to update the canonical_url so that your new blog site is the canonical reference - Finally check local site if all looks good at
http://127.0.0.1:4000/before pushing to Github
Note: There would be lot of HTML mixed with markdown in the blog and while you can certainly fix them into a markdown syntax, it would take a long time. I decided to let it be as long as the URLs/Images were fine
Comments
To setup comments on the blog, i chose disqus.com, The process is quite simple and you need to
create an account on Disqus and then make couple of changes into your _config.yml
# Disqus Comments
disqus:
  # Leave shortname blank to disable comments site-wide.
  # Disable comments for any post by adding `comments: false` to that post's YAML Front Matter.
  shortname: <your_shortname>
This would start showing the Disqus comment block if your page has comments: true in the front
matter
If you want to ensure that comments are enabled on all the pages then add below defaults to your
_config.yml, this is sweet :laughing: because you don’t need to repeat the same values in all the
posts frontmatter.
defaults:
  - scope:
      path: ""
      type: "posts"
    values:
      layout: "post"
      author: Gaurav
      comments: true
Psst 🤫: You might want to refer to this blog for details
Setup Google analytics
You might want to hook up Google analytics or equivalent to get some idea on your audience. Create an account on Google analytics and that should give you a unique id. Update that in your config.yml file and you are good to go with basic analytics.
Obviously there are more customizations that can be done, but that would probably be a future post
# Google Analytics
google_analytics: <unique_id>
Psst: 🤫: Refer to this for more details
Summary
Voila, You have a fully customizable site up and running. I will be posting more about this in the future as I learn more about Jekyll.
If you found this post useful, Do share it with a friend or colleague. Until next time. Happy testing.
References
Here are some more resources that you can refer:
- Jekyll docs
- Setting up domains in Github pages
- 4 steps to migrate from Wordpress to Jekyll
- Migrating from WordPress.com to Jekyll
To learn more about Jekyll, Check out Mike Danes videos on YouTube
Comments