How to manage your python virtualenvs with Pipenv

Attribution: Python logo and pipenv logo
If you are already aware of what virtualenv, virtualenvwrapper and pip is in the python ecosystem and have also heard or used pipenv and are just grepping for the commands to use to quickly set up and run an environment, then just refer to below:
TL;DR 😉
How to create a virtualenv with pipenv
If you thinking something along the lines of
I am aware of how to use requirements.txt file in python and have used virtualenvs previously, it works fine for my needs, frankly what is this pipenv module and why should I care? 🤷🏻♂️
Then do read on further for a bit of a long winding story 🍷
First, A bit of context 🤓
In python, the packaging story has had lots of options. Just take a look here if you want to understand what all options are available.
A tried and tested approach to quickly create a reproducible env for you app has been to use virtualenvmodule and install all the modules required using pipand then capture them with pinned dependencies versions using requirements.txt
Below is a sample requirements.txt file with pinned dependencies
certifi==2020.6.20
chardet==3.0.4
idna==2.10
requests==2.24.0
urllib3==1.25.9
Why do we need virtualenvs? Can’t I just install the modules on my base python installation?
This is a beginner question which every person new to Python and its ecosystem asks.
Well, The short answer is you can absolutely do that. However it’s not the recommended option.
Why? You might ask, Let me give you an example.
Let’s say I use Python 3.8 for my personal projects and want to use requests module version of
1.2.0.
But at work, we as a team have still have not shifted to the latest version and are using Python
3.5 with another version of requests = 1.0.2 (example)
Supporting this workflow is possible by creating two different virtualenvs with different python versions and I can quickly activate the required environment for use. It’s also quite trivial to destroy this environment and rebuild it again in case the environment is polluted or some dependency is breaking your app.
💡 Pro Tip: Please DO NOT install modules in your base python version (installed/pre-installed via the OS). You might accidentally update the version of a dependency which might break something in your system/project. Always use virtualenvs. 🙏🏻
Also, There are already abstractions built over virtualenv such as virtualenvwrapper and tox that make it a bit more convenient to use the venv (module for virtualenv). Diving into how they work is probably a story for another time. 🤔
A new hope ☀️
Pipenv is the new solution to this packaging story and it wraps over pip, virtualenv and provides a lot of virtualenvwrapper like capabilities while makes it super convenient to set up dependencies for your project.
It is written by Kenneth Reitz of requests module fame and is actively maintained by the python community. This tool has very quickly risen to become the recommended tool for Application dependency management by python. This is higher level tool than pip and can make it very easy for multiple contributors to work/manage dependencies in a large project
Let’s see how to install, setup and create a virtualenv for a project all via pipenv. We would use terminal commands and see how to work with pipenv. However if you are using an editor like Pycharm, we will also see how to set it up there.
Installation 🖥
To install pipenv, you can use homebrew on mac/linux
brew install pipenv
Or, Alternatively, You can also use pip directly with a user installation to install pipenv
pip install --user pipenv
Pre-requisites
If you work with multiple python projects on your machine, it is a good practice to store the virtualenvs in a central directory which you can easily refer to later on.
To enable that, we need to add an environment variable WORKON_HOME in a shell configuration file
of your choice (.zshrc, or .bash_profile)
ℹ️ In the absence of WORKON_HOME variable being set, pipenv would simply create the virtualenv in the current terminal dir
export WORKON_HOME=~/virtualenvs
export VIRTUALENVWRAPPER_PYTHON=/usr/local/bin/python3
export LANG=en_US.UTF-8
export LC_ALL=en_US.UTF-8
Create a project and virtualenv
Go to the project for which you want to create a virtualenv for, and then execute below command
cd test_project
pipenv --three
Executing the above command would give an output like below, notice it creates a virtualenv in
<strong>WORKON_HOME</strong> directory with the name of the project followed by a string.
(test_project-UdkZ3s0t)
Creating a virtualenv for this project…
Pipfile: /Users/gaurav/test_project/Pipfile
Using /usr/local/opt/python@3.8/bin/python3.8 (3.8.3) to create virtualenv…
⠇ Creating virtual environment...created virtual environment CPython3.8.3.final.0-64 in 464ms
  creator CPython3Posix(dest=/Users/gaurav/virtualenvs/test_project-UdkZ3s0t, clear=False, global=False)
  seeder FromAppData(download=False, pip=bundle, setuptools=bundle, wheel=bundle, via=copy, app_data_dir=/Users/gaurav/Library/Application Support/virtualenv)
    added seed packages: pip==20.1.1, setuptools==47.3.1, wheel==0.34.2
  activators BashActivator,CShellActivator,FishActivator,PowerShellActivator,PythonActivator,XonshActivator

✔ Successfully created virtual environment!
Virtualenv location: /Users/gaurav/virtualenvs/test_project-UdkZ3s0t
Activate the environment
To open a shell with the already created virtualenv
pipenv shell
You would see something like below:
Launching subshell in virtual environment…
 . /Users/gaurav/virtualenvs/test_project-UdkZ3s0t/bin/activate
➜  test_project  . /Users/gaurav/virtualenvs/test_project-UdkZ3s0t/bin/activate
(test_project) ➜  test_project
Notice that pipenv is invoking <strong>/bin/activate</strong> inside our created virtualenv just
as you manually would if you were not using a higher level tool like virtualenvwrapper
Installing package
To install any module in this newly created environment, type the module name from PyPi.
Below, we are installing requests module
pipenv install requestsThe above command outputs below.
Installing requests…
Adding requests to Pipfile's [packages]…
✔ Installation Succeeded
Pipfile.lock not found, creating…
Locking [dev-packages] dependencies…
Locking [packages] dependencies…
Building requirements...
Resolving dependencies...
✔ Success!
Updated Pipfile.lock (fbd99e)!
Installing dependencies from Pipfile.lock (fbd99e)…
  🐍   ▉▉▉▉▉▉▉▉▉▉▉▉▉▉▉▉▉▉▉▉▉▉▉▉▉▉▉▉▉▉▉▉ 0/0 — 00:00:00
Couple of things to note:
- pipenv creates a
Pipfile.lockfile (if it does not exist already) - Once the module is installed it updates
Pipfile.lockfile - Finally using the lock file it installs the dependencies
The Pipfile
Pipenv creates a Pipfile to keep all the required information about your dependencies. Let’s
inspect it’s contents
[[source]]
name = "pypi"
url = "https://pypi.org/simple"
verify_ssl = true

[dev-packages]

[packages]
requests = "*"

[requires]
python_version = "3.8"
Pipfile mentions the version of python required by this project under [requires] and has also
specified requests = "*" under [packages], notice, the * wildcard means we don’t care about a
specific version of requests as long as the latest version is installed.
This is different from pinning the dependency to a specific version like: requests = 2.24.0 and
offers more flexibility since pipenv would figure out the dependency graph and ensure that all the
required dependencies of requests module are automatically updated.
💡 For the people from the JVM world, a parallel can be drawn to
build.gradleorpom.xmlfiles wherein we specify which repository to pick the library from, the packages to import and the language version to use
Pipfile.lock
In addition to Pipfile, pipenv creates a Pipfile.lock as well which has finer level details about
the specific version of packages that are installed in the virtualenv.
Notice, any changes made manually to this can be overwritten if you update pipfile (with some new
package) and then run pipenv update
If you check the content of Pipfile.lock, you can notice that it maintains the version of the
module and its direct, transitive dependencies, This ensures pipenv is able to reproduce the
exact runtime environment every time
    "_meta": {
        "hash": {
            "sha256": "acbc8c4e7f2f98f1059b2a93d581ef43f4aa0c9741e64e6253adff8e35fbd99e"
        },
        "pipfile-spec": 6,
        "requires": {
            "python_version": "3.8"
        },
        "sources": [
            {
                "name": "pypi",
                "url": "https://pypi.org/simple",
                "verify_ssl": true
            }
        ]
    },
    "default": {
        ....
        "requests": {
            "hashes": [
                "sha256:b3559a131db72c33ee969480840fff4bb6dd111de7dd27c8ee1f820f4f00231b",
                "sha256:fe75cc94a9443b9246fc7049224f75604b113c36acb93f87b80ed42c44cbb898"
            ],
            "index": "pypi",
            "version": "==2.24.0"
        },
        "urllib3": {
            "hashes": [
                "sha256:3018294ebefce6572a474f0604c2021e33b3fd8006ecd11d62107a5d2a963527",
                "sha256:88206b0eb87e6d677d424843ac5209e3fb9d0190d0ee169599165ec25e9d9115"
            ],
            "markers": "python_version >= '2.7' and python_version not in '3.0, 3.1, 3.2, 3.3, 3.4' and python_version < '4'",
            "version": "==1.25.9"
        }
    },
    "develop": {}
Compatibility with requirements.txt
If you use requirements.txt file extensively with your project. You can easily generate a file
using pipenv.
pipenv lock -r > requirements.txt
Also, if your project already has a requirements.txt file then while doing
pipenv install, pipenv would automatically pick it up and install the required packages.
Tearing down a virtualenv
Removing a virtualenv is as simple as executing pipenv --rm
(test_project) ➜  test_project pipenv --rm
Removing virtualenv (/Users/gaurav/virtualenvs/test_project-UdkZ3s0t)…
Setting up a virtualenv using Pycharm editor
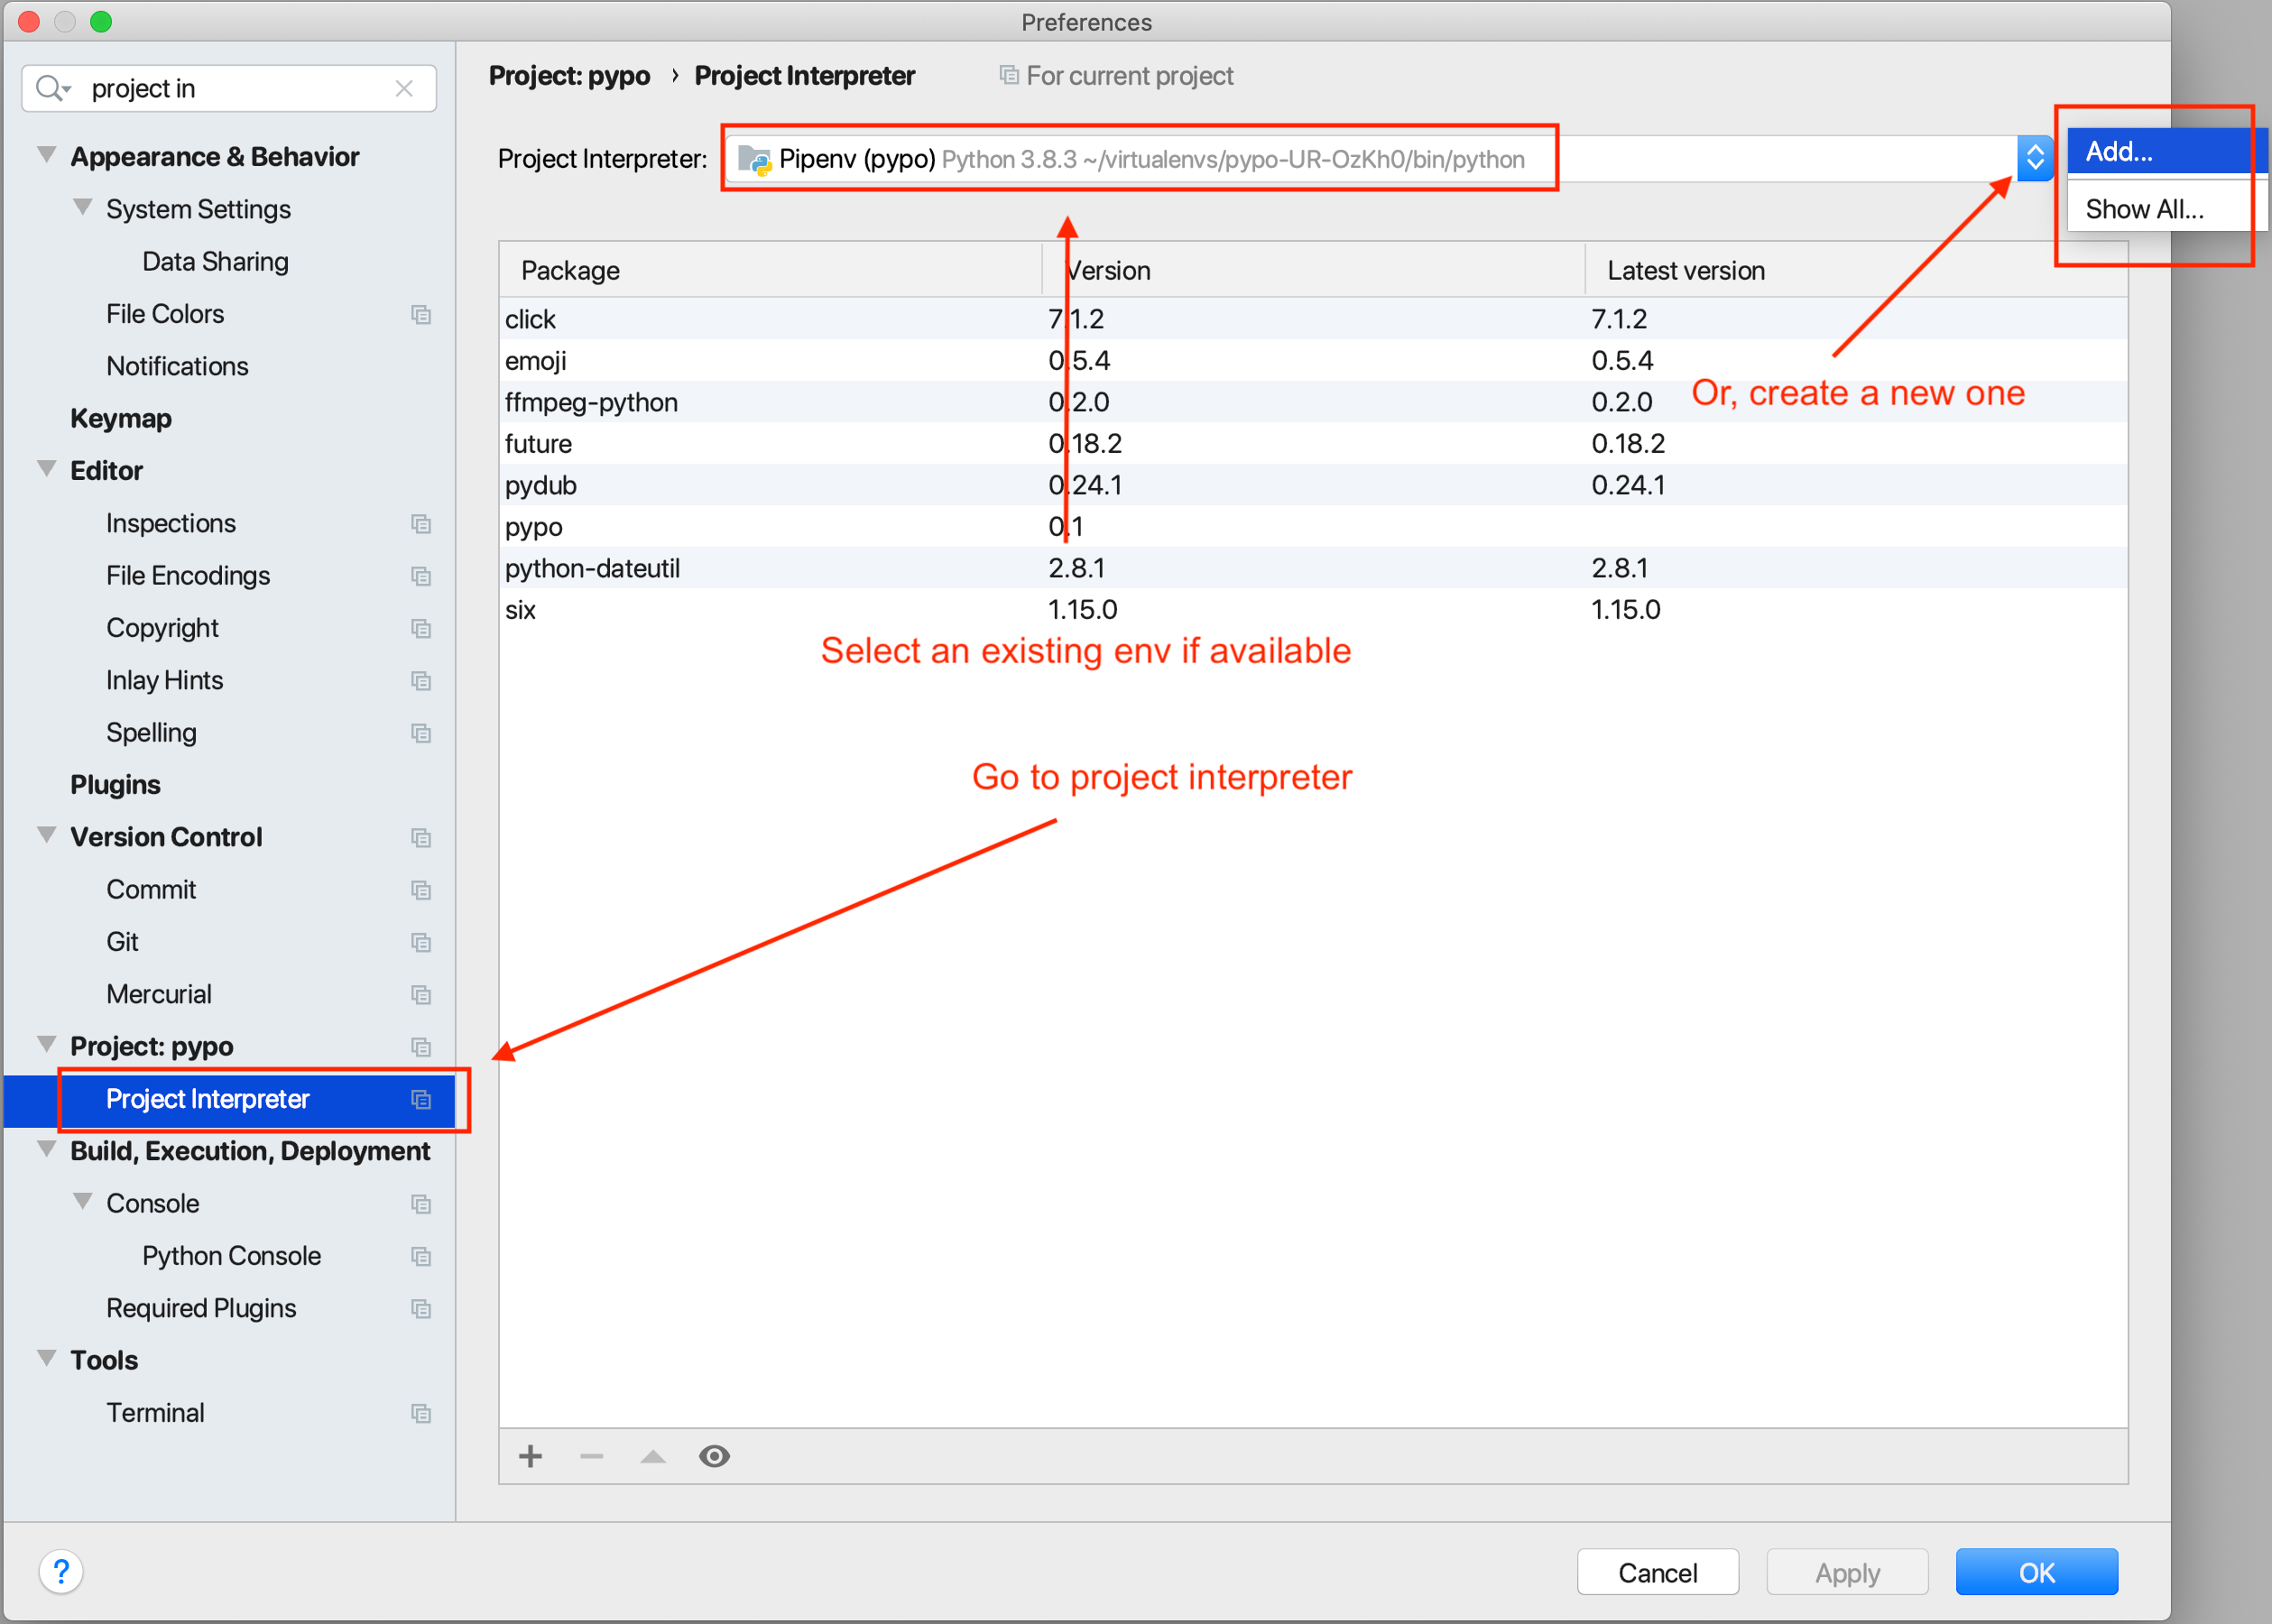
Pycharm provides a convenient way to use/and create a pipenv
Select an env
- Open settings
- Go to project interpreter
- If you have a pipenv that you want to share across multiple projects then select it from the drop down
- Else, Tap on the
...button on top right and click on Add new

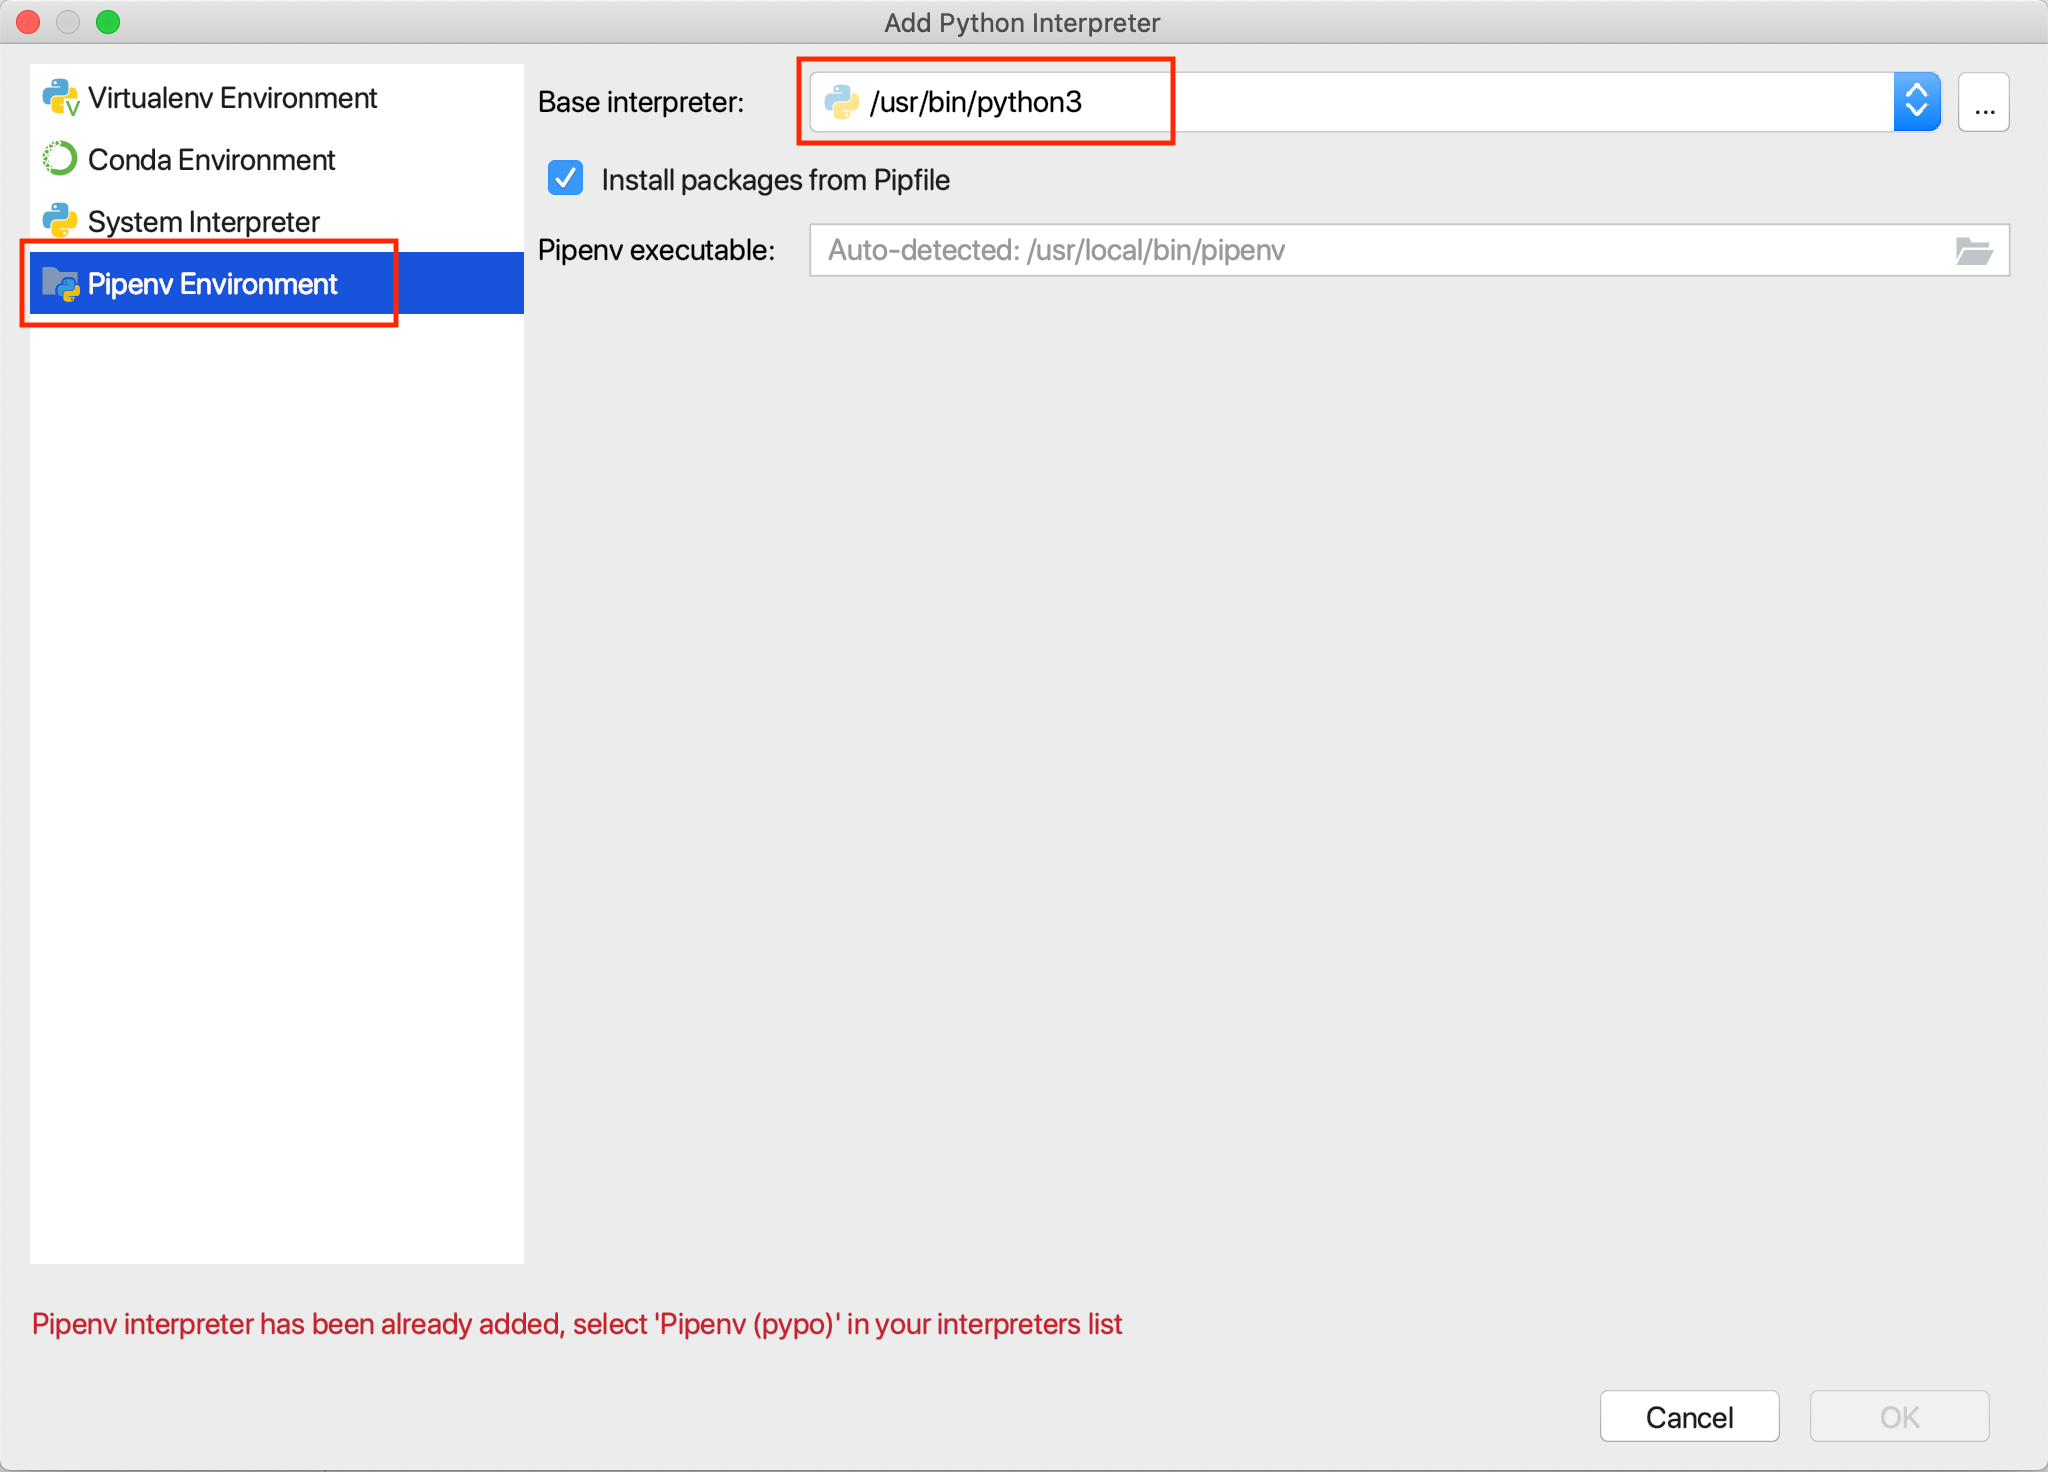
Create a pipenv
If you want to create a fresh env then click on Pipenv environment and select the base interpreter as the desired version to use.

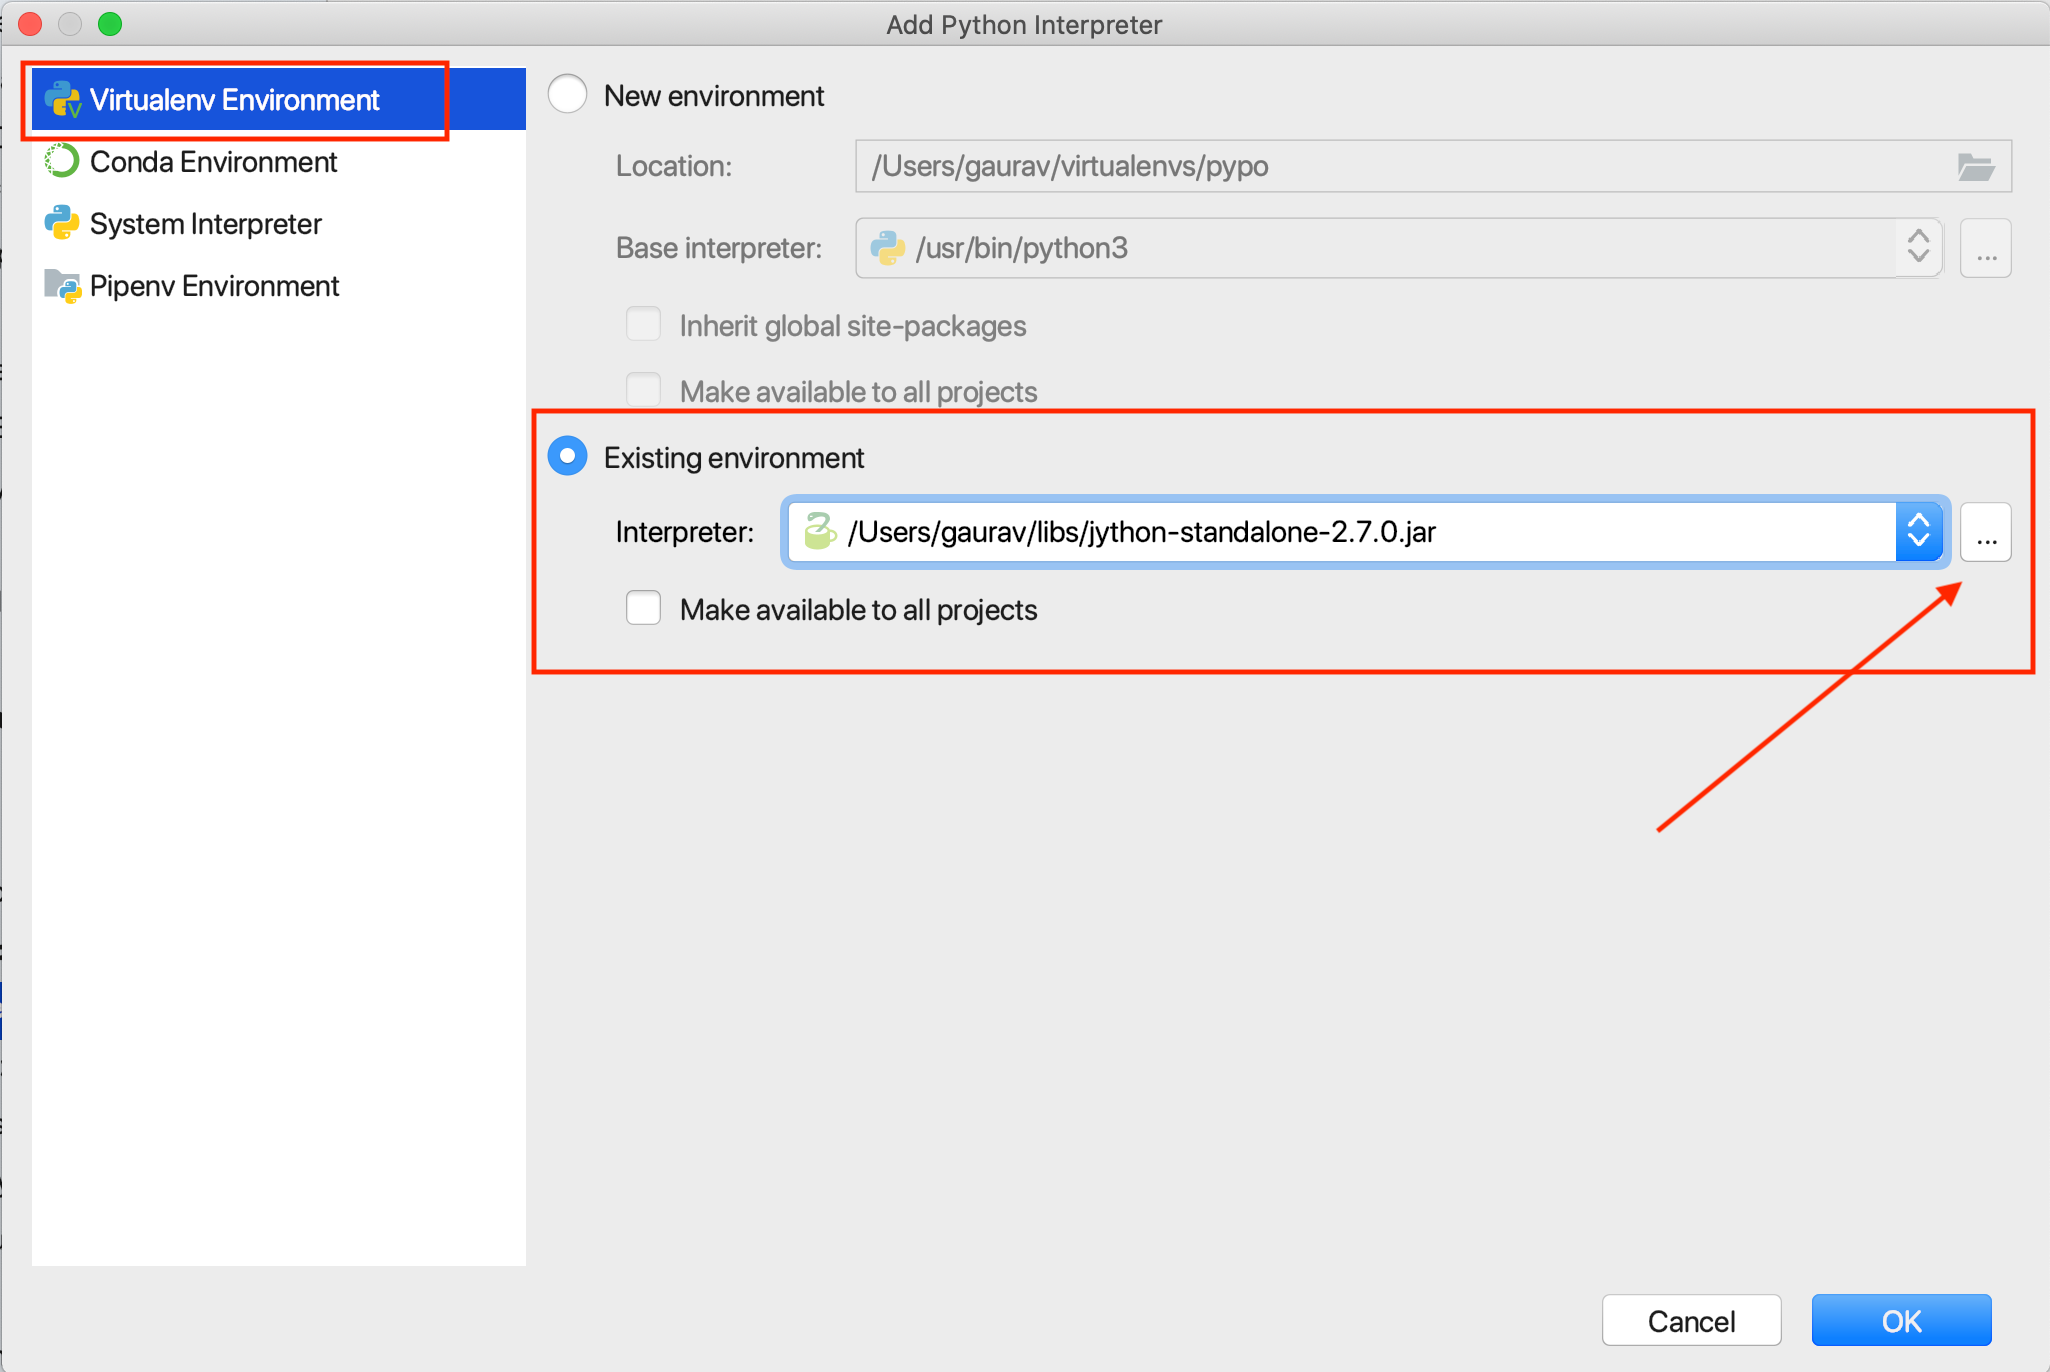
Select an existing env
Alternatively, If you have already created a pipenv via command line, then you can select it by
clicking on Virtualenv environment and under Existing environment, navigating till the path
where your virtualenv resides and select /bin/python

Conclusion
Pipenv is a really powerful tool that makes working with virtualenvs and dependencies a breeze. If you have not yet tried it out, I would highly recommend you to check it out.
If you found this post useful, Do share it with a friend or colleague. Until next time. Happy coding.
Further References
- Managing application dependencies on python.org
- Pipenv docs
Comments