
Hello, espresso! Part 2 Working with lists

In the previous post Hello, espresso! Part 1 Introducing you to the world of espresso automation!
We read an introduction to espresso, and understood how to write a basic test flow in espresso. We also saw the structure of an espresso test
In this post, we’ll dive into how to automate tests and work with list like
components using espresso. Examples of such components are AdapterView,
RecyclerView etc
Let’s go! 🏃🏃♀️
Working with lists in general
Using espresso, we can scroll to or perform an action on a given item in a list
We need this since sometimes the view you are interested in may not be present on the screen and espresso needs to scroll to it based on some matcher.
There are some nuances to this though:
- Android lists are created with
RecyclerViewonly a small no of child elements are created and they are recycled as you scroll. For these use cases, we can useonViewwithRecyclerViewActions AdapterViewhas data backed by an Adapter, for this we useonDatawith a custom matcher based on the how the adapter is designed
For these use cases scrollTo the method won’t work since that needs an
existing view
Let’s see an example and walk through how we could use espresso to scroll and act on elements for these types of components
Working with AdapterView
We’ll use DataAdapterSample for this post. You can find the app and test code
at
this
path in my forked Github repo
Understanding the app under test
Once you load the project in android studio and let gradle build it, you can run the app and see it load up on the emulator

Let’s understand the flow we want to automate a bit better
- we have a
ListViewcomponent where each row has aTextViewand aToggleButton - You can scroll in this list
- Once you tap on a row, there is a
LinearLayoutat the top that’s set with the row no
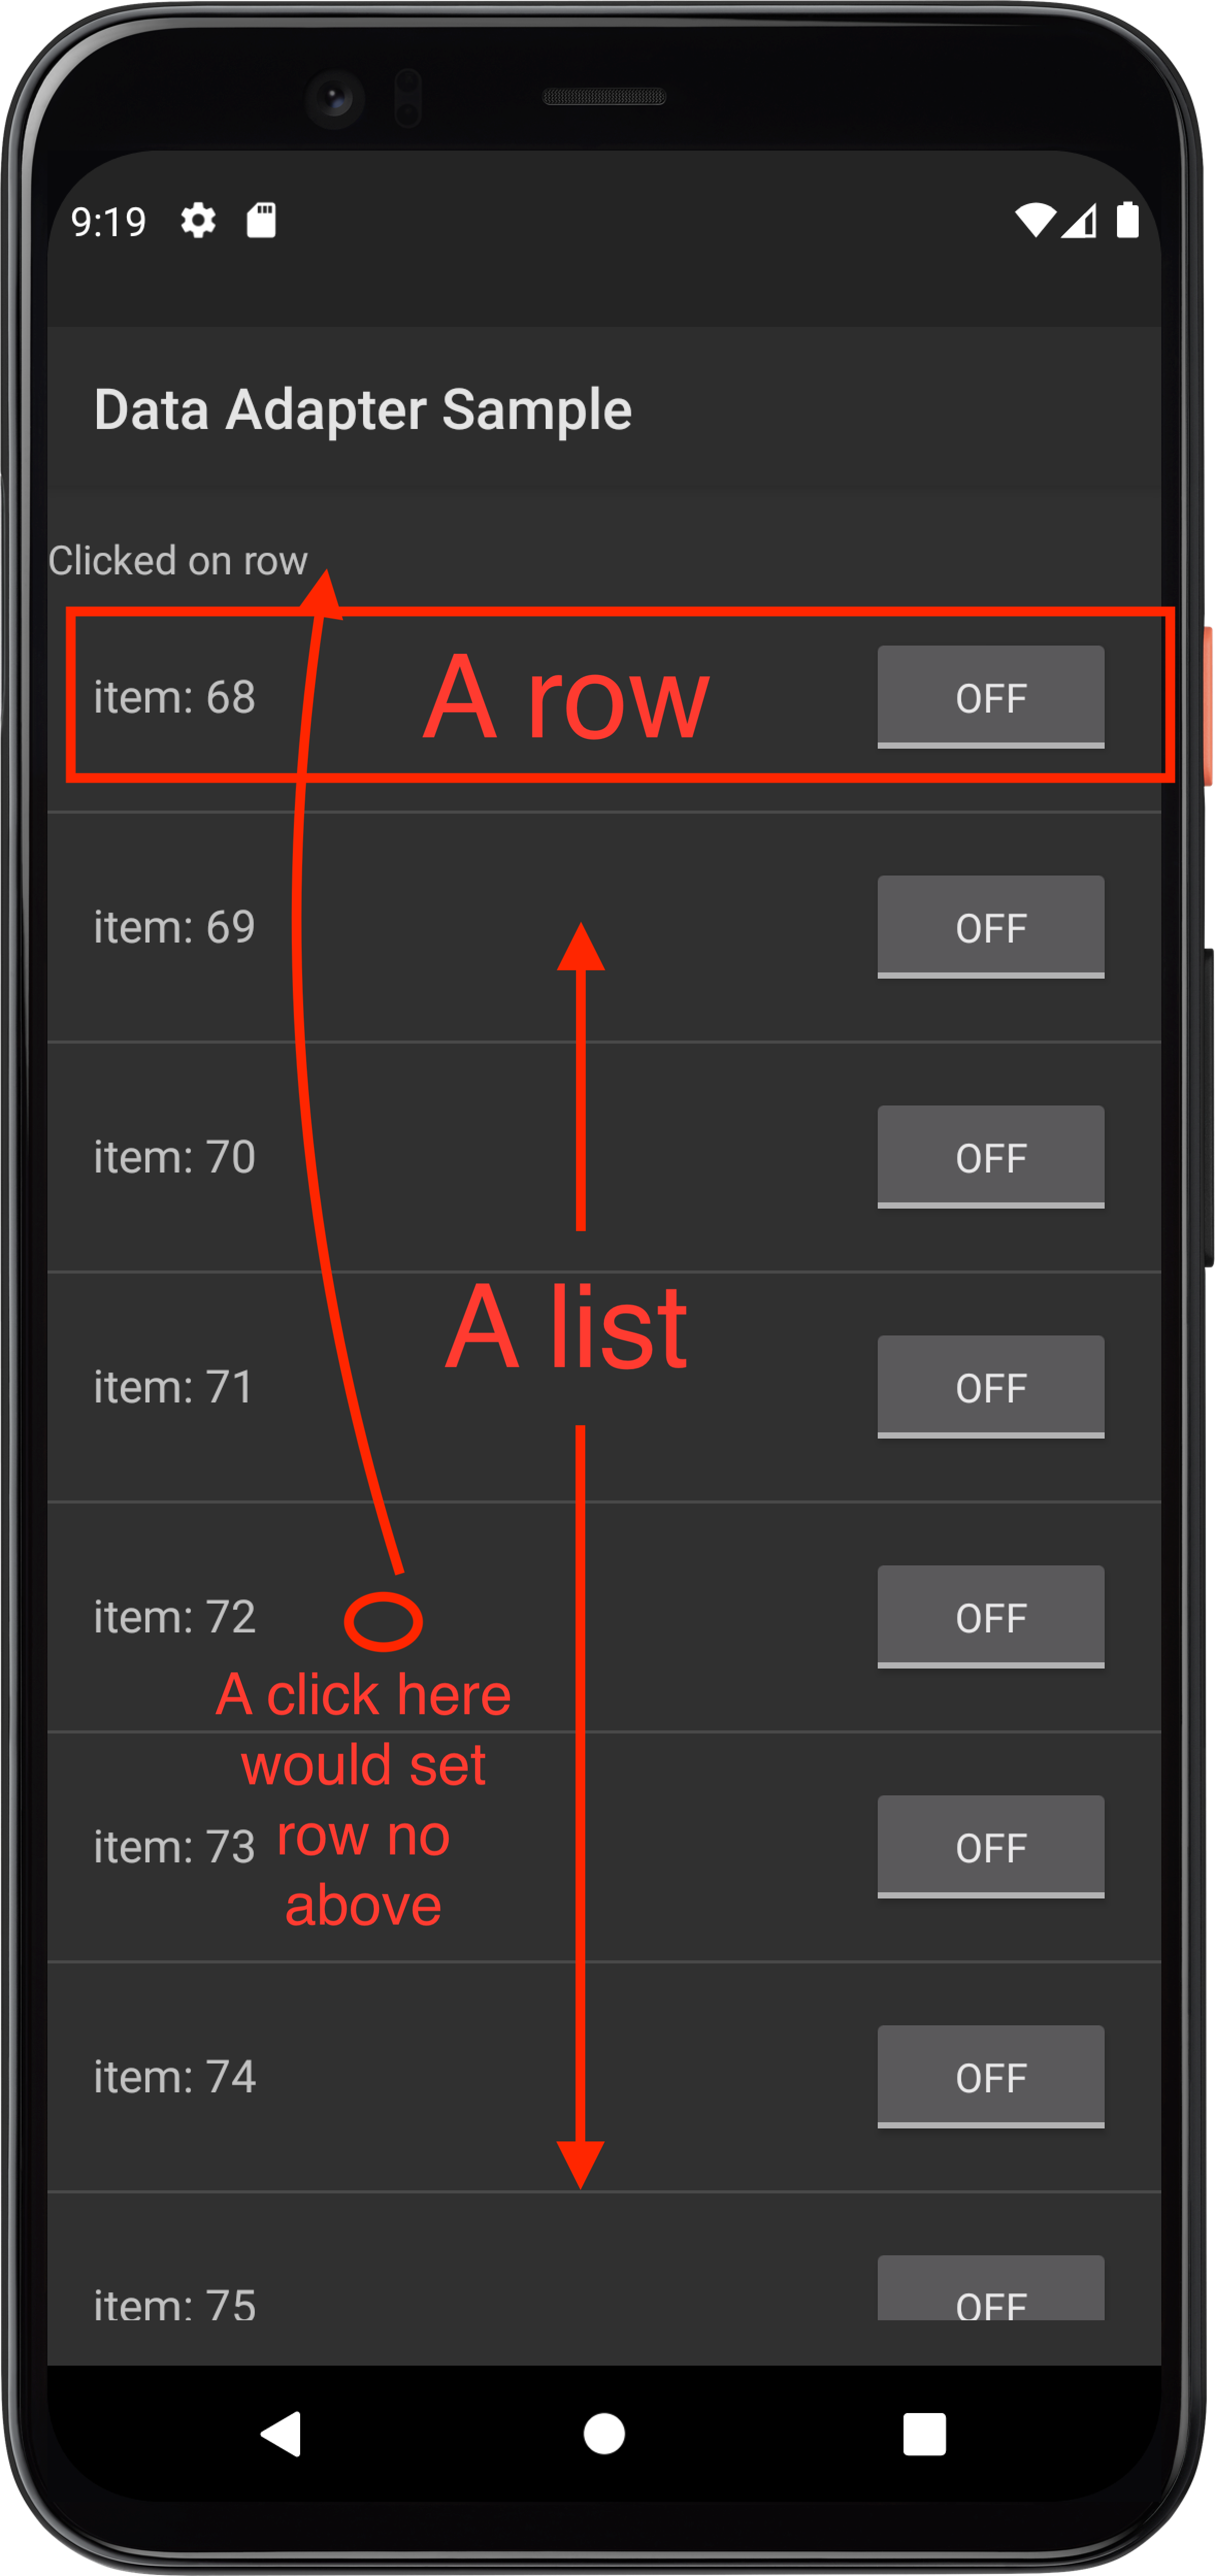
Assume that we want to automate this flow
Using Layout Inspector to figure out the app structure
You don’t need to dive into the source code to figure out how everything would render on the UI when the app is built
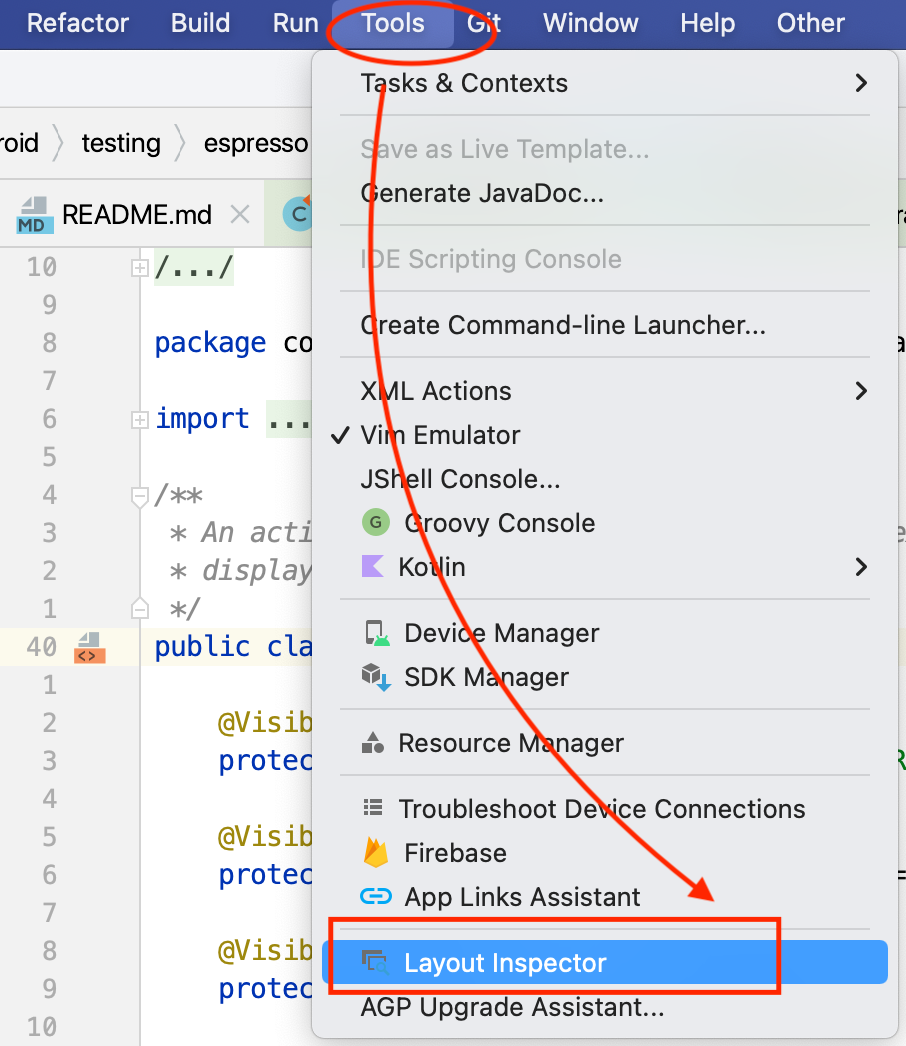
Android studio provides a convenient tool called Layout Inspector, that
allows us to inspect the Component Tree. (Kind of similar to
Appium Inspector) You can open it
by going to Tools > Layout Inspector, You’ll also need to select the process
you want to inspect (In this case you can select DataAdapterSample)
Open layout inspector
Understanding the UI
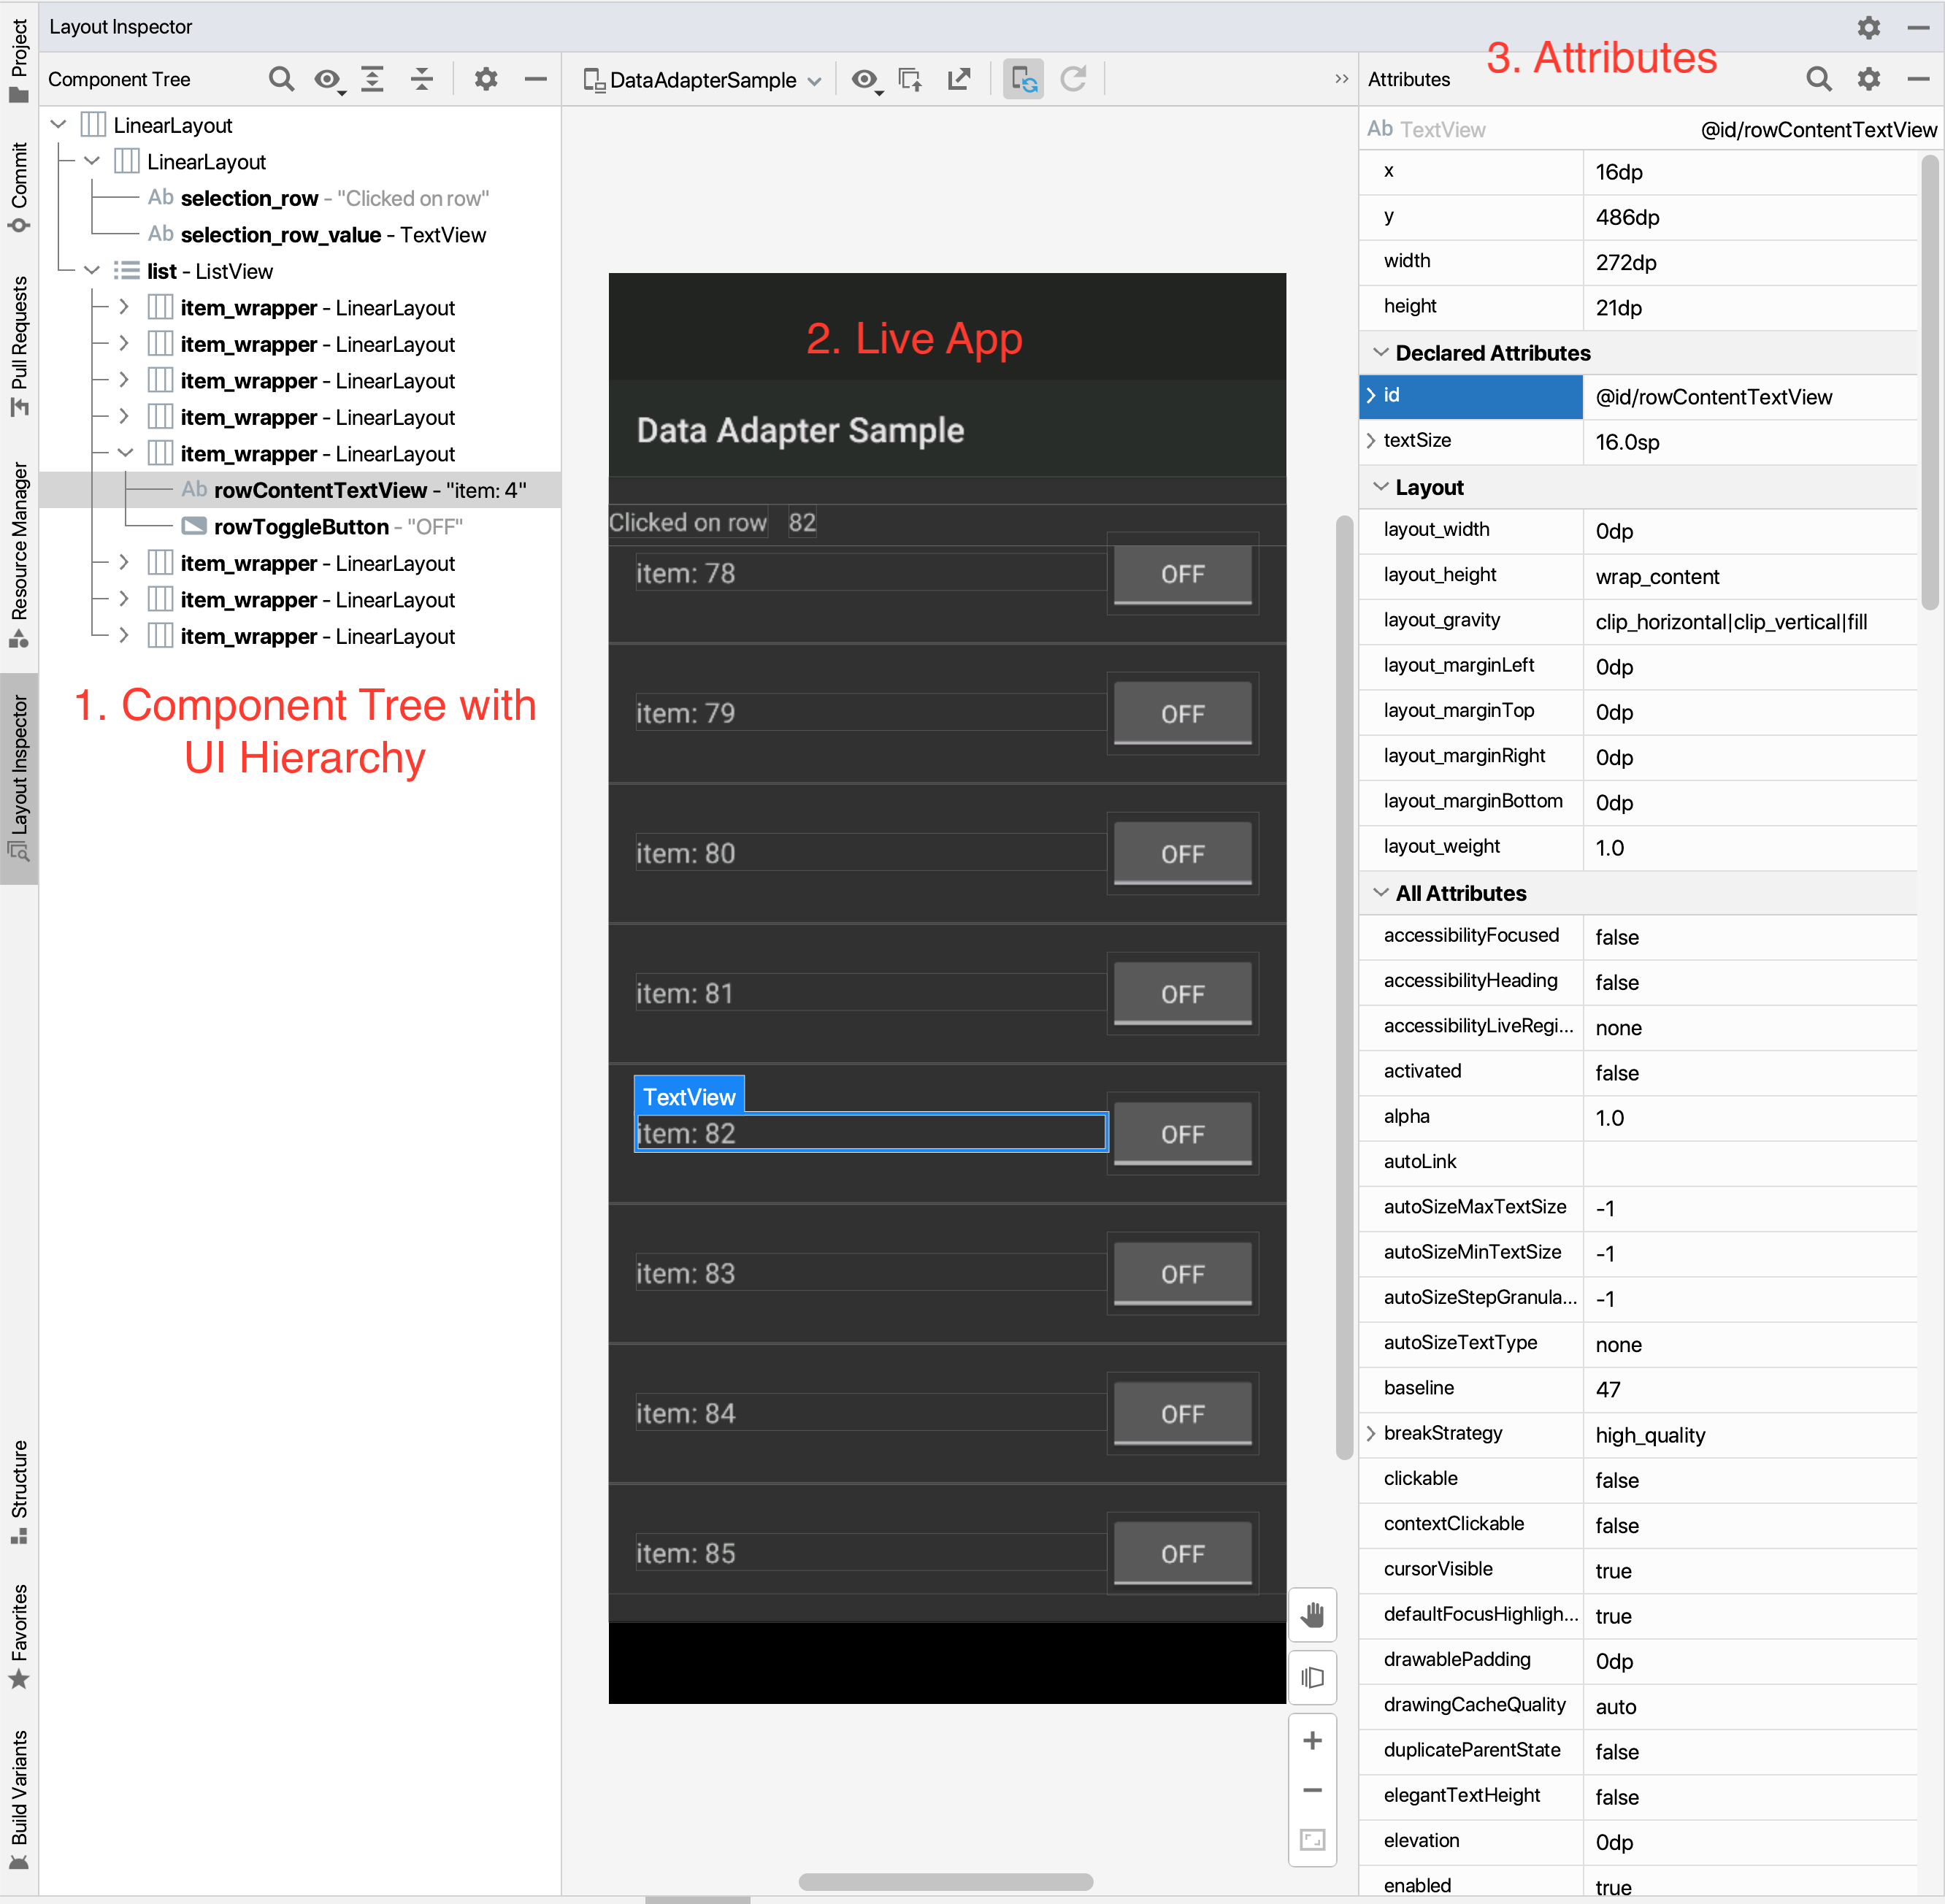
The layout inspector has 3 main sections:
- Component Tree: Here we can see the tree like structure that makes up our
current screen, we can observe the
ListViewwithTextViewandButtonand the staticLinearLayouton top - Live App: This section is refreshed as you interact with your app in the emulator, you can select any particular row and it would highlight the same in Component Tree and also show the attributes
- Attributes: Here we can see all the attributes or properties of the given element and use these while automating our tests in espresso
Writing our test for AdapterView
Let’s write our tests to perform the actions mentioned above
We’ll use a series of learning tests to explore how to test different aspects of this app and test and also learn espresso’s API a bit better, in a real test you may just write one test to perform the workflow you intend to test.
You can see the complete test file here with some helpful comments explaining what each test is supposed to do
Test control to be scrolled to is not visible
To start we want to create the usual structure i.e. Write our class
DataAdapterPractice with @RunWith annotation and use ActivityScenarioRule
to start our LongListActivity activity
@RunWith(AndroidJUnit4.class)
@LargeTest

public class DataAdapterPractice {
    @Rule
    public ActivityScenarioRule<LongListActivity> rule = new ActivityScenarioRule<>(LongListActivity.class);
    ...
Before we try scrolling, it may be helpful to verify that the item that we want
to scroll to (say a TextView with text: item: 99) does not exist, we can do
that with below line:
onView(withText("item: 99")).check(doesNotExist());
Here is the complete test:
@RunWith(AndroidJUnit4.class)
@LargeTest

public class DataAdapterPractice {
    @Rule
    public ActivityScenarioRule<LongListActivity> rule = new ActivityScenarioRule<>(LongListActivity.class);

    @Test
    public void whenAppOpens_ThenLastItemIsNotDisplayed() {
        onView(withText("item: 99")).check(doesNotExist());
    }
}
Test we are able to scroll to last item
Next, we want to be able to scroll to the last item with text item: 99, we can
figure out this text by actually scrolling in the app and then seeing the value
of text attribute in the layout inspector
If we see the code for
LongListActivity
we can see that the ListView gets its data from an adapter LongListAdapter
that has a hash map keys like ROW_TEXT and ROW_ENABLED
We can use this understanding to write our matcher to find this row
- To scroll to such an element we use
onDatainstead ofonView(since the element is not displayed on the view) - In our test, We want to find the element whose
ROW_TEXTisitem:99and we can do so usinghasEntryHamcrest matcher that is able to match elements in a hash map
onData(hasEntry(equalTo(LongListActivity.ROW_TEXT), is("item: 99")))
- Espresso would take care of automatically scrolling to this element for us
- We can then close the flow by checking that such a row is visible by using
below
ViewAssertion
.check(matches(isCompletelyDisplayed());
Below is how the complete test looks like:
@RunWith(AndroidJUnit4.class)
@LargeTest

public class DataAdapterPractice {
    @Rule
    public ActivityScenarioRule<LongListActivity> rule = new ActivityScenarioRule<>(LongListActivity.class);

    @Test
    public void whenScrollToLastItem_ThenLastItemIsDisplayed() {
        // We use onData since we want to scroll to an item in the list view
        // we use hasEntry matcher that takes two args, first the item check
        // and second the value
        onData(hasEntry(equalTo(LongListActivity.ROW_TEXT), is("item: 99")))
                // Then we check that this entry is displayed
                .check(matches(isCompletelyDisplayed()));
    }
}
Click on a row and verify the LinearLayout has expected test
If the user taps on a particular element in the ListView then the app updates
the row no in a separate TextView with id: selection_row_value
We can repeat similar steps to scroll to the element with text value 30, tap on it and then check if the TextView at the top is updated with the correct value
To click on a child element inside a ListView we can use onChildView() method
like below:
.onChildView(withId(R.id.rowContentTextView)).perform(click());
Below is how the complete test looks like:
@RunWith(AndroidJUnit4.class)
@LargeTest

public class DataAdapterPractice {
    @Rule
    public ActivityScenarioRule<LongListActivity> rule = new ActivityScenarioRule<>(LongListActivity.class);

    @Test
    public void whenClickOnRow_ThenTheTextIsUpdated() {
        String itemToClickOn = "item: 30";
        onData(hasEntry(equalTo(LongListActivity.ROW_TEXT), is(itemToClickOn)))
                // To click on an element in the list use `onChildView`
                .onChildView(withId(R.id.rowContentTextView)).perform(click());

        // Now that we are on desired item, we can verify using onView method
        String expectedValueAfterClick = "30";
        onView(withId(R.id.selection_row_value)).check(matches(withText(expectedValueAfterClick)));
    }
}
Working with RecyclerView
RecyclerView is a different type of list which ensures when the user scrolls
off a screen, it recycles elements in an efficient manner. We do not use
onData in this case. To understand how RecyclerView works you could read
this post
on Android developers
To work with RecyclerView, we can use espresso-contrib package in our app’s
gradle dependencies
androidTestImplementation 'androidx.test.espresso:espresso-contrib:' + rootProject.espressoVersion;
The dependency supports below actions:
Scrolling in a RecyclerView
scrollTo()- Scroll to matched viewscrollToHolder()- Scroll to matched view holderscrollToPosition()- Scroll to specific position
Performing action on element
actionOnItem()- Perform view action on matched viewactionOnHolderItem()- Perform view action on a matched View holderactionOnItemAtPosition()- Perform a view action on a view at a specific position
App under test
For these tests, we’ll use
RecyclerViewSample
test app
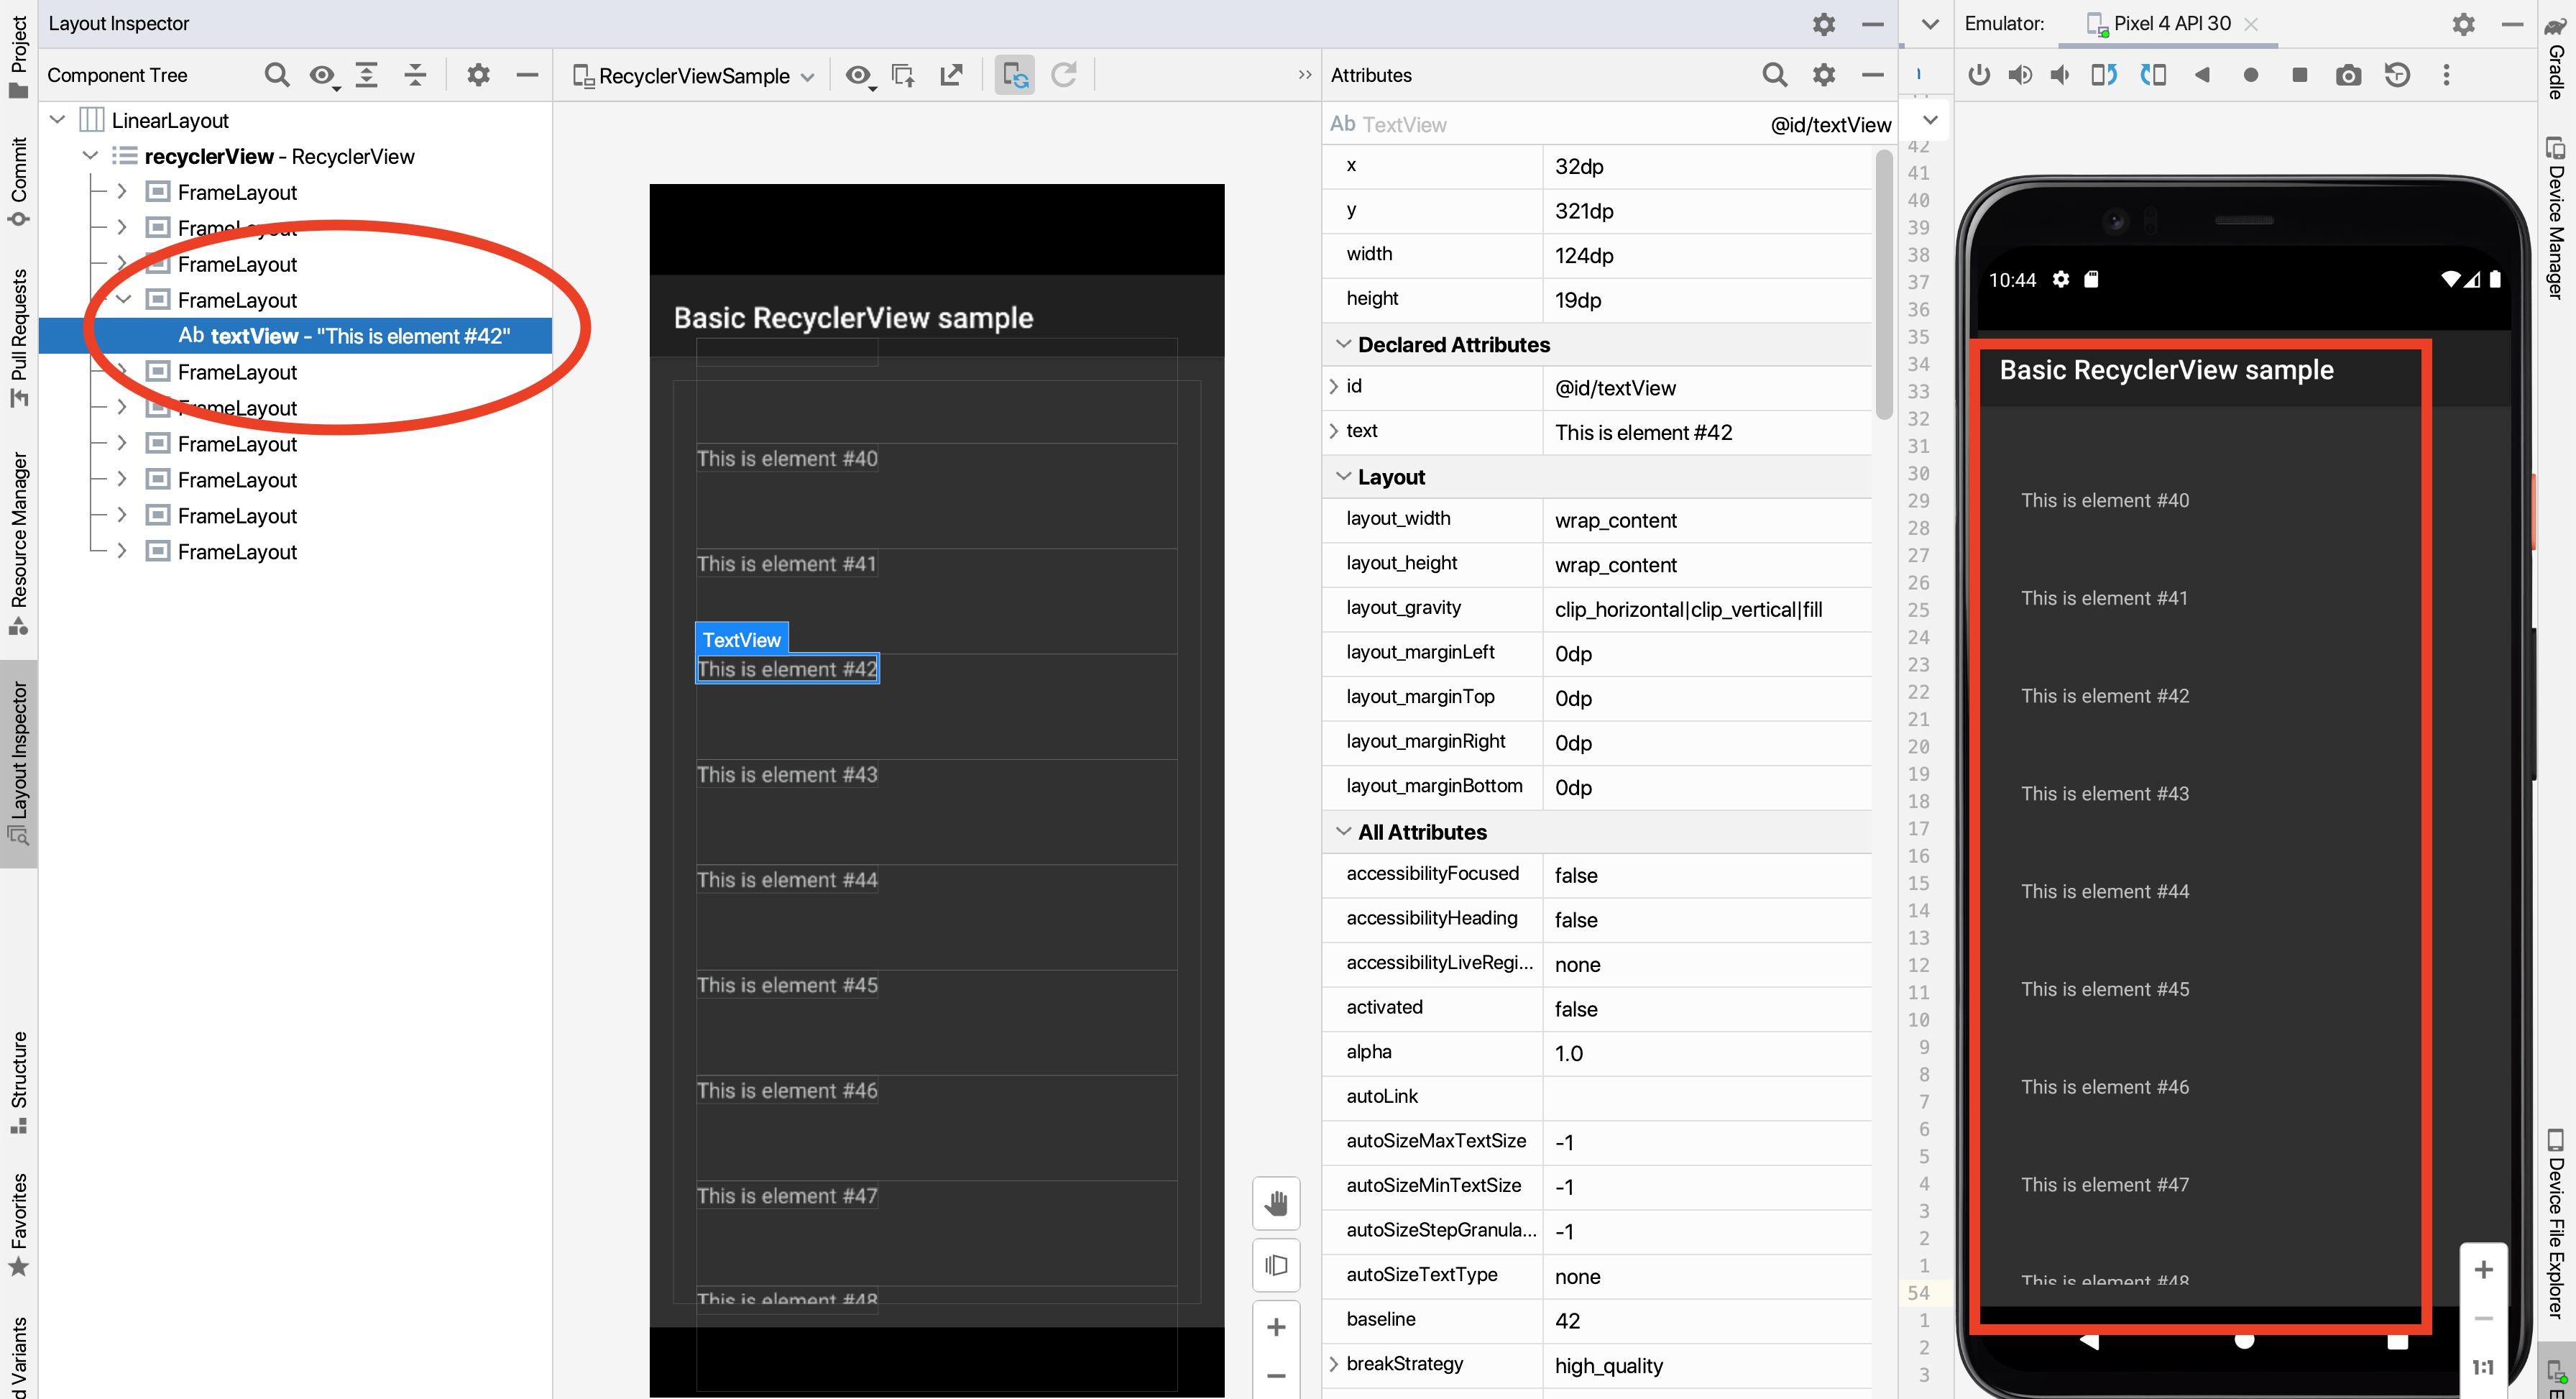
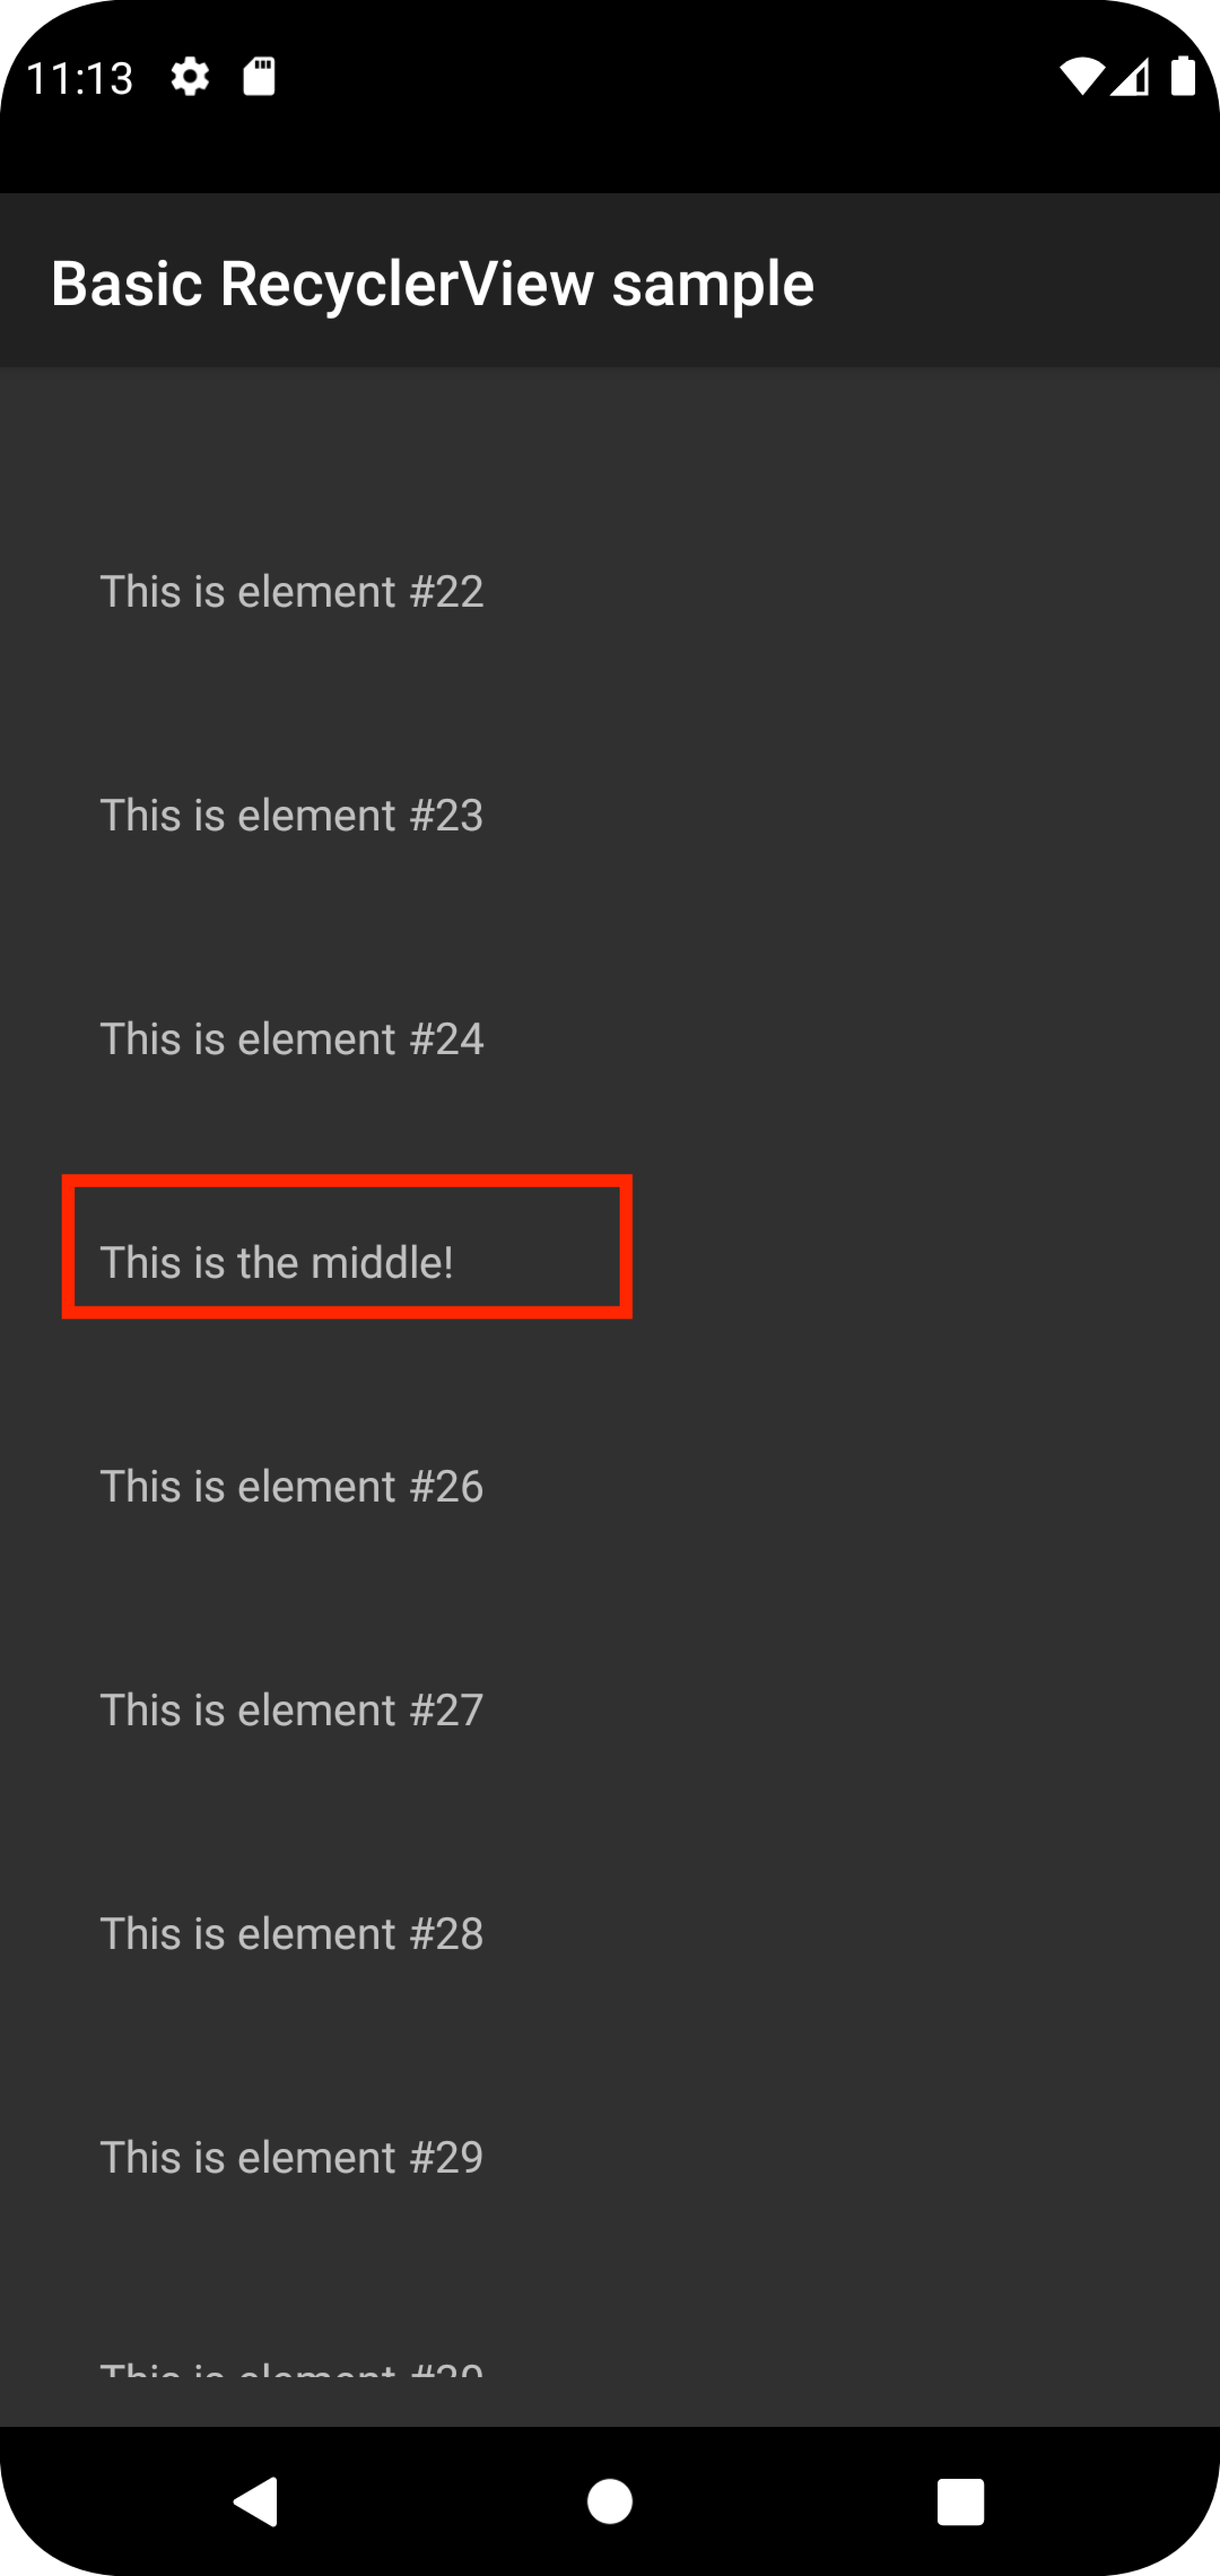
In this test app, we have a RecyclerView where each row is a TextView having
text like This is element #42, as the user scrolls the same elements are
recycled and reused by Android framework
Learning tests
Let’s write some tests for this app
Test that a given element is not present in the list and espresso throws an exception
We’ll start with a negative test, what if we try to scroll to an element that
does not exist, we should expect espresso framework to throw an exception in
this case, this test also is a good way to demo the scrollTo method in
RecyclerViewActions
- We use
onViewto find our RecyclerView (getting its id via layout inspector)
onView(withId(R.id.recyclerView))
- We then use
scrollTomethod inRecyclerViewActionsand usehasDescendantViewMatcherto check that a hypothetical element with textnot on the listis present. Naturally this throws an exception and we handle that by adding@Test(expected = PerformException.class)in the JUnit test assertion
.perform(RecyclerViewActions.scrollTo(hasDescendant(withText("not on the list"))));
Below is th how the complete test looks like:
@RunWith(AndroidJUnit4.class)
public class RecyclerViewSamplePracticeTest {

  @Rule
  public ActivityScenarioRule activityScenarioRule = new ActivityScenarioRule<>(MainActivity.class);

  /**
   * This is a negative test that tries to scroll to a descendant that does not exist in the app We
   * use Junit @Test annotation to verify that this test throws a PerformException
   */
  @Test(expected = PerformException.class)
  public void whenAppOpens_ThenItemWithTextIsNotVisible() {
    onView(withId(R.id.recyclerView))
        // Here scrollTo will fail if there are no items that match expected descriptions
        .perform(RecyclerViewActions.scrollTo(hasDescendant(withText("not on the list"))));
  }
}
Test we can scroll to a fixed position and click on it and check its displayed
Let’s say we want to scroll into our list to the 40th item and click on it, we
use actionOnItemAtPosition method to specify the position and also add the
click() method to click that
onView(withId(R.id.recyclerView))
        .perform(RecyclerViewActions.actionOnItemAtPosition(itemBelowFold, click()));
We can then check if the item with expected text is displayed using below:
String expectedText = String.format("This is element #%d", itemBelowFold);
onView(withText(expectedText)).check(matches(isDisplayed()));
Below is how the complete test looks like:
@RunWith(AndroidJUnit4.class)
public class RecyclerViewSamplePracticeTest {

  @Rule
  public ActivityScenarioRule activityScenarioRule = new ActivityScenarioRule<>(MainActivity.class);

  /**
   * Test to scroll in a recycler view to an item at a fixed position And verify that the element
   * with expected text is displayed
   */
  @Test
  public void whenScrollToItemAtAPosition_ThenItemIsDisplayed() {
    int itemBelowFold = 40;
    onView(withId(R.id.recyclerView))
        .perform(RecyclerViewActions.actionOnItemAtPosition(itemBelowFold, click()));

    String expectedText = String.format("This is element #%d", itemBelowFold);
    onView(withText(expectedText)).check(matches(isDisplayed()));
  }
}
Test we can scroll to the middle using a custom matcher
Our app has a special row in the middle with a text: This is the middle!,
let’s say we want to scroll to this elements holder and then verify its
displayed
We can use scrollToHolder and pass it a custom matcher to verify if it has
reached the middle
onView(withId(R.id.recyclerView)).perform(RecyclerViewActions.scrollToHolder(isInTheMiddle()));
Let’s see how isInTheMiddle() method is implemented
We create a new TypeSafeMatcher of type CustomAdapter.ViewHolder which
overridden implementation of matchesSafely that returns getIsInTheMiddle()
methods output. Note: The support for this method is added in apps source code
private static TypeSafeMatcher<CustomAdapter.ViewHolder> isInTheMiddle() {
    return new TypeSafeMatcher<CustomAdapter.ViewHolder>() {
      @Override
      public void describeTo(Description description) {
        description.appendText("item in the middle");
      }

      @Override
      protected boolean matchesSafely(CustomAdapter.ViewHolder viewHolder) {
        return viewHolder.getIsInTheMiddle();
      }
    };
  }
To see the app impl supporting this, see
CustomAdapter
class that has a method onBindViewHolder which sets this flag in
viewHolder.setIsInTheMiddle(true); if the position == mDataSet.size() / 2
Finally, we can check if the view is displayed using:
String expectedText = String.format("This is element #%d", itemBelowFold);
onView(withText(expectedText)).check(matches(isDisplayed()));
Please see the complete test below:
@RunWith(AndroidJUnit4.class)
public class RecyclerViewSamplePracticeTest {

  @Rule
  public ActivityScenarioRule activityScenarioRule = new ActivityScenarioRule<>(MainActivity.class);

  /**
   * This test scrolls in recycler view till it finds an element with text: "This is the middle!" It
   * uses a field already set in the View holder implementation to determine it has reached the
   * point And a custom hamcrest matcher
   */
  @Test
  public void whenScrollToItemInTheMiddle_ThenCheckItemWithSpecialTextIsDisplayed() {
    onView(withId(R.id.recyclerView)).perform(RecyclerViewActions.scrollToHolder(isInTheMiddle()));

    onView(withText("This is the middle!")).check(matches(isDisplayed()));
  }

  private static TypeSafeMatcher<CustomAdapter.ViewHolder> isInTheMiddle() {
    return new TypeSafeMatcher<CustomAdapter.ViewHolder>() {
      @Override
      public void describeTo(Description description) {
        description.appendText("item in the middle");
      }

      @Override
      protected boolean matchesSafely(CustomAdapter.ViewHolder viewHolder) {
        return viewHolder.getIsInTheMiddle();
      }
    };
  }
}
Further reads
You can read Espresso lists on Android developers
Conclusion
Hopefully this post gives you an idea on how to work with list like components in espresso. Stay tuned for next post where we’ll dive into how to automate and work with intents with espresso
As always, Do share this with your friends or colleagues and if you have thoughts or feedback, I’d be more than happy to chat over at twitter or comments. Until next time. Happy Testing and coding.
Comments